Monday, May 31, 2010

Viking Recumbent Tandem Trike update - painting!


Primer was applied yesterday. First coat of paint is now done! Just using standard spray paint - Tremclad fire engine red -  with black accents.

Good thing the rain held off this evening so I could get 'er done. It poured last night, so had to wait until this afternoon to apply the first coat of red paint.

I take my time, using smooth, steady strokes, shaking the can several times in between sprays. The only annoying part about painting is that your trigger finger gets a cramp!


I keep a rag handy to wipe off the end of the nozzle which helps eliminate drips, too.

The second coat will be applied tomorrow, then a few days to cure. The plan will be written up this week. Hope to have it online this weekend. Will be riding it in a few days!


Not too bad for backyard painting! Our grass is always multi-color every summer.

Marauder-II recumbent lowracer video online

For reasons we can't remember, never did upload this video to YouTube. Thankfully, someone in the Atomic Zombie forum mentioned it, so it's now online.


Marauder Recumbent Lowracer DIY PDF Plan Download - AtomicZombie


The Marauder Recumbent is a lean and mean racing machine guaranteed to make you feel as though you are piloting a human powered jetfighter! The Marauder is a chameleon, with the ability to adapt to the cycle track, as well as the urban landscape. Because of the long wheelbase and smooth suspension, the Marauder offers a very smooth and well-behaved ride on practically any style of terrain.

The Marauder is a great way to get an intense workout and show off your building skills. Because the design is based on common bicycle parts, you won't crash your budget, and can be riding it in a few weekends. There is plenty of room for modifications, and the Marauder Recumbent makes a great platform for experimenting with aerodynamic fairings or electric power. Every step of the build is detailed using high resolution photos, complete explanations of how each part of the vehicle works, and tips on how to customize the design. Even if you have never taken a hacksaw to a bicycle, you will be able to follow along and complete the build.

The only downside to owning a lowracer such as the Marauder is that it can get very lonely when you leave all of your "wedgie" riding pals so far behind! With such impressive aerodynamics and an aggressive seating position, all of your available power will translate into speed, rather than fighting the wind. The frontal area on the Marauder is 40% better than a standard upright bicycle, so you will cheat the wind and feel the speed.

Take a look at our Builder's Gallery to see other Marauder Recumbent examples, including many creative modifications to the plan. Our international builders community ranges from students to retired engineers, but they all have one thing in common - the desire to build their own stuff!


Plans, tutorials, videos and
more

Plans, tutorials, videos and
more

Plans, tutorials, videos and
more

Charlie Chops' StreetFox - AtomicZombie.com

Boy, time flies when you're having fun. I had the bike out after my last post about a week ago it, but while I did maintenance on the roadster so that I can start driving it soon.

I got back to the StreetFox yesterday. I re-did the bars as they were too low and limited my turning radius quite a bit. I cut them off a couple inches out from the stem and re-oriented them similar to the direct steering bars on a Terra Trike. I bought a couple Mirro mirrors from the local bike shop and tried them first in the bar ends but had to move my head too far to glance at them, so I made a 3" long post out of some more handlebar stock and positioned them close to the end of the brake levers. They look around my big self quite well, so that's where they will stay.

I hadn't done a very good job on the first fitting of the Avid BB7 discs but I managed to get them sorted and cut out all the drag. They work fantastic. I like then so well I believe I will retrofit them to my Giant suspension bike when I rebuild it sometime this summer. It's a 2002 that just rolled 5,000 miles and the gearing, chain, brakes and cables are due for rehab.

So, I got the StreetFox out yesterday and road it a few miles. I'm surprised how heavy it is—around 50 pounds is my guess. I have a 300 limit scale in the shop. I weighed me at 251 and then stepped on it with the bike in my arms and it went TILT. Not much more I can do for that problem, but there is still a chunk of main rail to come off in front of the bottom bracket (BB) and a few more lightening holes I can place here and there.


   Pedal effort seems high, however the cranks are 5mm shorter than what I'm used to. The gearing is way off also. With it I hardly ever go up on the big ring unless I've got a really huge downhill. On the StreetFox I had to get a couple - three gears into that ring to feel about right. That's something I will remedy when I find appropriate upgrades.

When I first rode it a week or so back I had a lot of pedal cadence front end wobble which may have been caused to some degree by the mal-adjusted front brakes. Seems better now. The BB assembly is slightly out of square so that the derailleur sits crooked. The idler pulleys can come in closer to the main rail - easy fix. The seat does need a buttocks pad, but otherwise works as I envisioned. The bolsters keep me well contained and I can corner it quite sharply even at 12/13 mph.


Overall, I'm quite pleased with how it turned out. It'll probably never be done as I continually make running changes in the hot rods. The wheelbase ended up at 45-1/2". I could have squeezed maybe another inch - inch and a half out of that by moving the upright for the dropout back more. Another way to save a little more space might be use a seat post with the elastomer in it in place of the shock/spring. I'd like to get a suspension SF down to a 40" wheelbase. This bike is nearly done, but I will build another with higher grade parts secured first, then match drop out width as required for the wheel, etc. Next winter's project.


StreetFox Recumbent Tadpole Trike DIY Plan - AtomicZombie


Plans, tutorials, videos and
moreThe 
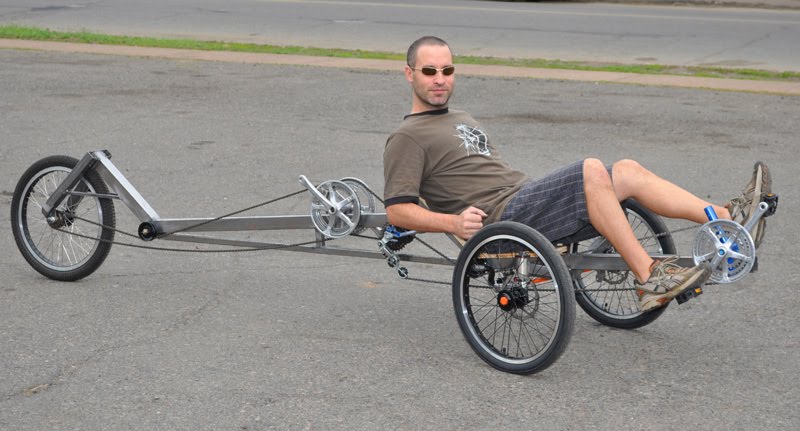
StreetFox Recumbent Trike is a fast and comfortable version of the classic "tadpole" style trike (two wheels in the front), which includes rear suspension, three wheel braking, and 26 inch rear wheel for optimal gear range. The StreetFox looks and handles as good as any commercially produced trike, and can be completely made using commonly available and inexpensive bicycle components and some square tubing. Not one single machined part is needed. The StreetFox has an adjustable bottom bracket so it can fit riders of most heights, from 5 feet to well over 6 feet tall. Due to the rugged construction and use of sturdy 14 mm axle, 48 spoke front wheels, the StreetFox can easily accommodate riders over 250 pounds.

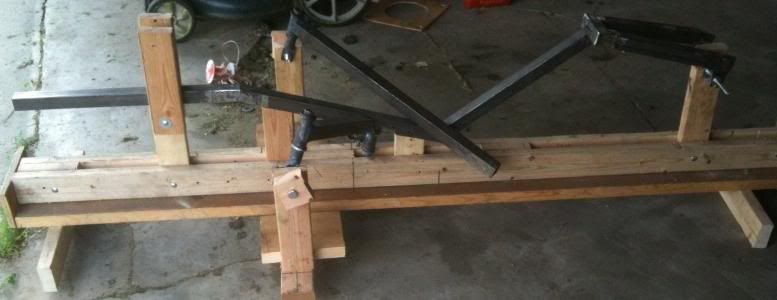
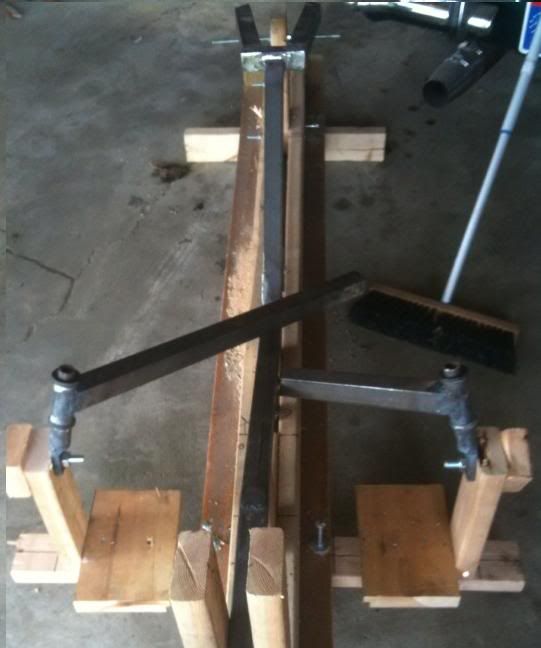
Because this project only requires a basic welder, an angle grinder and a hand drill, the StreetFox can be built by anyone with the desire to put a little effort into this rewarding hobby. Because of the simple mono tube main frame, the 
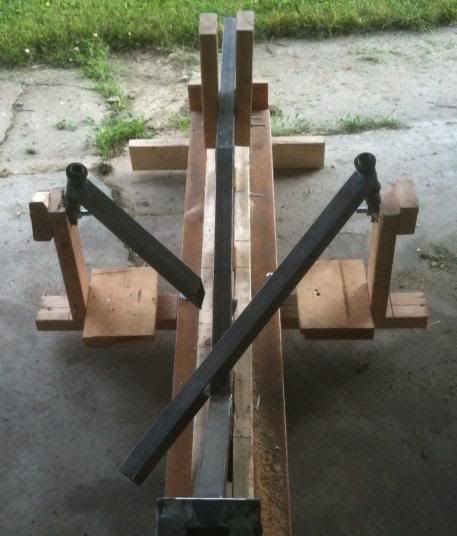
StreetFox is highly customizable, allowing the builder to alter the plan to suit his or her own needs, or simply to try new ideas. The most complex part of the trike is obviously the steering, but the StreetFox uses commonly available and "bullet proof" BMX wheels and hubs, so you don't need to source hard-to-find, expensive front wheel parts. All three wheels have standard bicycle brakes and cables as well, so you can find most of your parts by salvaging old bicycles or at most bicycle stores.


Every step of the build is detailed in high resolution photos, with clear instructions on how to calculate critical angles and lengths based on the parts you have on hand. The final product is a very sleek looking tadpole style trike that looks professionally built and rides like a dream. Enjoying the scenery on a comfortable recumbent trike is like sitting in your favorite chair, but you can always put your ankle to the pedals and get the wind in your hair because the StreetFox is as fast as it is comfortable.

Plans, tutorials, videos and
moreTake a look at our Builder's Gallery to see other StreetFox examples, including many creative modifications to the plan. Our international builders community ranges from students to retired engineers, but they all have one thing in common - the desire to build their own stuff!

All of Atomic Zombie Extreme Machines plans are downloadable PDF format. Multiple discounts, free tutorials, videos, gallery, newsletters, blog and more:


Plans, tutorials, videos and
more

Meet AZ Krew members and bike builders - AtomicZombie.com


Name:  Dan
Forum name:  newrider3
Stats:  Single, 14-21   
Location:  Colorado,    USA
Occupation:  Student   
How you found Atomic Zombie:  Internet search
When joined the forum:  2008-ish   
Building bikes experience:  Newbie, no previous experience
Welding experience:  Some previous experience
Why did you join the Atomic Zombie builders community?  Good advice, see others’ builds
Favorite type of bike:  Fun/crazy
Why?  No set style, build what seems right.   
Projects you have completed: Short wheel base recumbents, choppers, trikes, fun/crazy
Current bike project(s):  Trikes
Type of welding: MIG (Metal Inert Gas)
Building challenges:  Working with crappy steel; burning holes whilst welding               
How have you overcome these challenges?  Try harder   
Advice for other bike builders:  Try harder   
Suggested web sites: www.weldingtipsandtricks.com
Advice and/or words of wisdom? Include Builders Tips, Welding Tips, etc.:  Don't wear jeans with holes in them - the fringes catch on fire easily. Ask me how I know!

Sunday, May 30, 2010

Dragonwood Trike - homebuilt wooden recumbent


No real stretch here. Dragonwood is a Wolf in Dragon's clothing. Actually the rear axle is from my Deltawolf.

The build began July 2009. First came the seat spine laminated from 1/2 ply shaped to fit my back. I then laminated two strips of Ash and one Walnut into curved ribs for the seat and back. These were done by placing a block of wood on the bench and pulling the ends down with a pair of clamps.

Next came the main frame, an I-beam with a web of 1/2 ply capped top and bottom with laminations about 1 1/4 wide by 3/4 thick. The beam curves up to meet the steering post and was made overly long. I then dry fit the seat to the beam and figured distance from seat to bottom bracket (located just behind the curve in the beam). I could then locate the rear axle.
Using wood solids and laminates I made the rear axle using rear axles, pillow blocks and disc brakes from my Wolf. I then bolted the steering post in place, after welding on plates, and put the rear wheels on and sat down, feeling pretty self-satisfied.

 Did I mention I weigh 300 lbs? The frame twisted over like a - well you know what I mean! So, now I've revealed where the artistic flow in the frame comes from. I formed the curved laminations to counteract the torsion. I began by clamping a single strip in place at one end and then twisting and bending until I liked the curve then clamped the other end. 

The next day when the glue was dry, I added two more layers with many clamps and so on for several days until enough thickness was built up. I then decided to use solid 3/4 Ash to stiffen the neck area. This was heavily contoured using a circular carving rasp disc in my grinder.


Handlebars for the under seat steering were built up in a simple frame to hold the bends in place. The ends were drilled out for short lengths of metal handlebar to hold the brake clamps and shifter and then I lathed turned grips and slid them on the tubes.

A 4-speed hub was mounted under the seat acting as a crossover and transmission. I tack welded a small chain sprocket to the off side and led the chain to the rear axle. I carved the head and mounted it and used two LED blinking bike lights for the eyes. Last thing was to cut fender shapes from 1/4 ply and then bend strips into the dragon wing ribs. Finally finished April 2010. More than 10 months!


What started out to be a simple wood beam Wolf style racer turned into a heavier artistic expression to be ridden in parades and fun rides. Over the winter (after beginning the build) I developed nerve problems in my legs which is limiting my pedaling ability. So, I'm going electric assist and plan to put a front hub motor on the Dragon. There is room behind the seat for batteries. I don't have any intention of giving up. Stand by for the next trike already on the drawing board with parts being collected.


 ~ Big Moe (David Moeller) 3 wheels and an old crank.


Dragonwood Specs:
  • Laminated frame, seat and handlebars of Ash and Walnut
  • 20 inch front, no brake. 26 rears with disc brakes
  • 4-speed "transmission" with provision to add derailleur at pedals
  • Almost 8 1/2 ft. long because I'm long (6'5")
  • Several coats of high-gloss poly

Atomic Zombie News 

Sick chopper from Estonia - AtomicZombie.com builders gallery

Hi. Here are pictures of my bicycle. I´m from Estonia (it`s in Europe). :)  ~ Martin Pääro


Great stuff! Looks like it's based on OverKill Chopper, sans the phat rear tire.

OverKill Chopper is appropriately named because everything about it is way over the top. With its ridiculously wide rear wheel, and ultra long forks, what else could it be called other than OverKill? Does a chopper really need a dragster tire on its rear end, or such a high frame? Not really, but does a roadster really need a Hemi? You know where I'm going with this. Actually, the main reason I built OverKill to such outlandish proportions was to retaliate against the mass marketing of big box store choppers.

Even though this sick chop has proportions that rival some of the petrol-burning street customs, it certainly won't bust your wallet or require you to spend the next year in a machine shop. The fact is, OverKill is built from nothing more than an old car rim, some scrap bicycle parts, and a few lengths of electrical conduit using only a welder and grinder. Yes, anyone can pull this one off using the tricks shown in the plan.. Every step of the build is detailed using high resolution photos, and you will be amazed at how simple it is to add bicycle spokes to the car wheel, and there is plenty of room for you to add your own evil modifications to the frame. How does it ride? Dude, look at this beast, it was made for cruising!

Saturday, May 29, 2010

Atomic Zombie June newsletter online

It's our largest Atomic Zombie newsletter ever, jam-packed with tons of informative stuff, features, pictures and build blogs, including:

• Viking Tandem Trike - NEW Atomic Zombie bike builders DIY project
• Teen's Warrior Trike video
• Meet AZ Krew members
• Bike Builders Tips
• Builders Gallery
• Dragon DeltaWolf
• Builder Feedback
• Powder Coat Painting
• Recumbents Rule!
• High Rollin' Dutchman Recumbent
• FAQs
• Vigilante Chopper
• DIY Kick Bike
• and more!

http://www.atomiczombie.com/main.aspx?click=news

Thanks to all of our contributors. Contact KoolKat through the AZ builders forum if you'd like to submit something for future newsletters.

Viking Recumbent Tandem Trike Test Ride Video


We took a brief video of Brad testing the Viking Recumbent Tandem Trike this evening. Even though there are only a few tack welds in some places, he ended up taking for a boot without any problems.

How'd it handle? Watch the video and find out!

www.youtube.com/watch?v=mfQEWMVwCx4

Friday, May 28, 2010

Viking Recumbent Tandem Trike - test ride success!


Wednesday:  To test the ergonomics of the under seat steering system and styles for handlebars, I drop on my basic plywood base seat and try out different lengths and heights for the handle bars. The Viking handlebars will be typical as compared to most tandem trikes, with plenty of room for the levers and shifters. The stoker will also have under seat handlebars, although they will be in a fixed position.


Tomorrow (Thursday), I will try to get the transmission installed if I have the chance to spend another day in the AtomicZombie Garage. I am estimating that there are still three full days of work left in this project before I get to crack the top of the first can of bright red spray paint, and we are eager to hit the road and see how the Viking will handle.

Thursday:  Murphy decided to pay another visit today (you, know that dude who made that stupid law). I spent a few hours working on the cross-over system that will allow independent pedaling and managed to get it all together and welded to the bike.

But, I then realized that due to the support hardware, the hub would not be able to be removed from the bike because the chain rings hit the support tubing… doh! Although I cut up the faulty hardware, the photo (red dropouts) does show how things were going. Oh well, that is one of the reasons I usually work indoors when overly tired, but I really want to get this trike finished. Tomorrow will be better… I can feel it!


Friday:  It was a good day of hacking today! The independent transmission system went together in record time and worked perfectly on the first try. OK, I messed it up yesterday, but let’s not live in the past. I had to dig around in my junk pile for a while to find a matching set of cranks (need 3 right sides), but I found some that I liked. The goal is to tack everything together than give the Viking a test ride to see how the steering and transmission will work. It’s difficult to know how well steering is set up just by rolling the trike along the few feet of the garage floor that isn’t a mess with scrap tubing and bike frames.


Just before the initial test run, I noticed that one of the chain links was left open and that the entire cross-over unit only had two small tack welds holding it to the frame. I fixed the chain with a link tool and decided that those two tack welds would probably hold up to a few minutes of light pedaling. I said this once before when testing my StreetFighter Quadcycle and it was a short ride!


Hey, it works! I actually forgot about the tack welded transmission and was spinning up dirt with the rear wheel. Steering felt better than I thought it would, able to carve a pretty decent circle for such a long trike. Everything went smooth considering the rear chain tensioner is not even connected yet.

I am very happy with the way the Viking steers and rides so far, so tomorrow I will finish up and get the frame primed. What is left to do: back rest tubing, seat mounting tabs, rear chain tensioner, front chain guide hose, frame end caps, and the final welding inspection. After primer is curing, I will make two identical seats, then get to spray painting the Viking. It should be completely finished in a couple of days, then will write the plan while the paint cures. Stay tuned...

Choppified mountain bike from Hungary - AtomicZombie.com builders gallery

HEY! This is my bike called SR Suntour 'RottenSzaby'. Thanks, Szaby, Hungary

Thursday, May 27, 2010

High Rollin' Dutchman Recumbent - AtomicZombie.com builders forum

Below you see a fellow bike-hacker (actually he's building a big electric carrier bike) modeling on the HR to show the lack of knee/handlebar clearance.


Wouter shows there's no room for the legs


No other option than to cut the goose neck!


This is my HR in its current state. I made the gooseneck extra long (since it easier to make it shorter than longer afterward).

There is plenty enough room now for the knees. The steering is a bit less nice than before though. The longer goose neck adds extra tiller of course and it also flexes a little..

Besides these details it is an absolute blast to ride! It is fast, comfortable and the view is great. And I'm very glad the HR is high enough for people to see you, even cars when you're next to them. I also found out that you DO can see quite a lot behind you by turning the neck and looking over the shoulder. Still thinking about mirrors though. Today I also took some detours over grass, gravel, or curbs for the fun and to overtake people. The bike handles it fine!

I asked the guy from the recumbent shop/factory in this town if he could hook me up with some extra long brake and shifter cables and he said he could. Then I will FINALLY install it, do the final adjustments and tidying and then.. paint!

Arthur

UK recumbent lowracer

Dear Atomic, I hope this is ok for your low racer gallery. Best Regards, Neil Stanley, UK


Wednesday, May 26, 2010

Viking Tandem Trike build update - AtomicZombie.com

The next step in the Viking Tandem Trike build is the two front booms that will extend outwards front the front of the frame to hold the two front wheels and steering hardware. The steering geometry and front end are always the most complex and finicky part of a tadpole trike, and I have done my best to make this one as easy to build as possible by using only one angle in the front frame design.


The head tubes are set at 90 degrees and the center-point steering is automatically set by the angle of the two boom tubes, so this takes some of the difficult work away from building the front end. I won’t lie to ya though - it’s still a lot more work than watching TV!

One single V formed by the two front booms creates the center-point steering angles as well as sets the exact height for the front of the frame. This geometry also allows room for under seat steering as well as a place for the chain to pass without getting overly complex with more than one idler pulley. Some tadpole trikes are a horrific mess under the seat due to overly complex chain lines and steering hardware, and I am doing my best to avoid this.


I cannot live with “good enough”, so it took most of a day to cut, weld, cut, and re-weld all sorts of different steering bits in order to get the Ackerman steering geometry to track perfectly through the entire range of motion. Since the inside wheel in a turn has to carve a tighter circle, the steering geometry must account for this or one wheel will scrub in a turn, causing excess friction and tire wear.

Claims that this is a “feature” designed to slow the trike down in corners is just not my style, so I hacked away at the positioning of the steering rods and control arms until the trike made a prefect turn at all angles. I have learned that this process can only be done by trial and error although there are mathematical guides that can get somewhat close some of the time.


After five attempts at various steering setups, I came up with the perfect placement of control arm and connecting rod. A simple jig made of a bit of wood and a screw was made that would make it easy to set the control arms up for welding. Although the Viking shares a lot of the front design with our Warrior Tadpole Trike, it’s amazing how much different the steering geometry had to be in order to eliminate all wheel scrub during tight turns.


Under seat steering is not hard to create once all of the angles and control arm positions are known. Some of the other concerns I dealt with when creating the steering system were the position of the chain as it passes by the control rods as well as the clearance for handlebars. If a chain line is an afterthought, there will probably be more than one idler pulley necessary and as many as three if the design is really messy. More pulleys, means more power loss and points for failure. I am still aiming for a single idler, although I will not claim success until the chain is installed tomorrow!

To test the ergonomics of the under seat steering system and styles for handlebars, I drop on my basic plywood base seat and try out different lengths and heights for the handlebars. The Viking handlebars will be typical as compared to most tandem trikes, with plenty of room for the levers and shifters. The stoker will also have under seat handlebars, although they will be in a fixed position.


Today, I will try to get the transmission installed if I have the chance to spend another day in the AtomicZombie Garage. I am estimating that there is still three full days of work left in this project before I get to crack the top of the first can of bright red spray paint, and we are eager to hit the road and see how The Viking will handle.


Possibly an initial test ride later today!


Tuesday, May 25, 2010

My Warrior Trike jig

darwin-t
AZ Krew Guru


I modified the jig I made for my first bent to use it to build my Warrior trike.

Today, I added to it for the steering tubes. At first I built it to hold the front wheels in the proper place, but couldn't clamp the tires tightly enough to secure them. So, I adapted the jig to hold the axles in just the right place. 
 
This makes it pretty easy to do the cuts on the steering tube. I did the cuts on one boom, ground it down to fit and tack welded it in place in about 40 minutes.