"Get your hands dirty! Take a headset apart! you'll soon have to anyway if you intend to build a bike of any kind. Now you may become hesitant once you start and begin to see nuts, washers, Oh! Oh! is that bearings in there. I'll attach exploded views of both older and newer headsets so you'll know what you're getting into before you start and believe me you aren't going to break anything. Get an older bike and take it apart, have a plastic ice cream dish or something similar handy to drop the parts into as you take it apart."
Read more and join the discussion: Locks for Bike Components - Atomic Zombie™ Extreme Machines Builder's Forum
Thursday, September 30, 2010
Lowrider drag bike chopper - AtomicZombie.com builders gallery

"So, I ordered your plans for the Overkill chopper over a year ago. But I finished it. I think you might be impressed. I kind of deviated from the plans and wanted it to look more like a 'lowrider-drag bike'.
The rear wheel is a real 18 x 10 Dayton wire wheel that I bought off craigslist.

Have a look at the photos. Let me know if you have any questions. Cheers, Peter Scharlock
Sammamish, Washington"


Wednesday, September 29, 2010
Christmas sleigh trailer - Atomic Zombie™ Extreme Machines Builder's Forum

Forum member and bike builder Choppersrule (Mark) of Townsville, Australia, is working on a new project: Christmas sleigh trailer - Atomic Zombie™ Extreme Machines Builder's Forum
Hammerhead trike project - Atomic Zombie builders forum
"I rolled this out for a couple short test rides today. Rides nice... tracks straight. Tomorrow I work on some cargo space, front brakes & maybe spill some paint on it" ~ srdavo
Read more: http://forum.atomiczombie.com/showthread.php?t=4599
Bike building and project advice - Atomic Zombie builders forum
"When most of us started on this forum & others that we are family to, we had some ideas as to what we wanted, but didn't know how to get those ideas out of our heads and into something more tangible.
The best advice I can give, is simply this:
A): Spend the time to read every thread & post, on every topic of this forum (several times if time permits)
I know I did this and many of my first response questions were already answered somewhere in the wealth of information that I read.
B): Be prepared to throw questions out into the ring if you are still in need of answers.
C): Counter any 'criticism or rebuttal to your questions' with broad shoulders, and offer your experiences and testimonies to all you feel would benefit from them.
D): Build your ideas to the best of your abilities, taking lots of pics along the journey, and ask your peers to critique you, if necessary. Most people on here are not wanting to cover your newly oiled chain in sand, and more often than not, they will gladly bend over backwards to help you not make the same mistooks that they made on their journey.
~ PeterT"
Sound advice. http://atomiczombie.com/plansfaq.html
Essential link for noob and experienced builders alike: http://forum.atomiczombie.com/showth...2016#post32016
Essential link for noob and experienced builders alike: http://forum.atomiczombie.com/showth...2016#post32016
Polishing bike parts for extra bling
~ By Charles Mitchard (Atomic Zombie builders forum), Australia
When building re-cycled bicycles of any description we often go to great lengths to ensure the final product is pleasing to the eye. Sometimes it’s the little things that make a huge difference so we buy new ones to create that finished shiny appearance.
I haven't done the costings but it is possible to clean and polish even heavily corroded components for very little outlay. For only one bike it may not be that cost effective if you have to purchase all the equipment but if you only have one item such as an electric drill then it becomes much more affordable and many dollars can be saved.
Tools required and safety hazards

If the original parts were anodised then this has to come off as well. Caustic soda solution (DANGER, BURNS FLESH) will do the job but Easyoff (or similar) oven cleaner is a tad safer. Both methods are messy.
Use the wire wheel on a drill or the bench grinder (I use a drill press) to remove all the paint, corrosion and other blemishes. Be careful on aluminium, as the wires will leave deep grooves which you can see in the picture if kept in one position for too long. If no wire wheel is available then use coarse emery cloth which in all honesty will do a better job but take longer.
The next bit is heaps of elbow grease. Go down through the grades of emery cloth from the coarsest to finest sanding till all the blemishes from the previous grade have been removed. Deep gouges are not possible to remove but most other damage is.

Heavy damage can sometimes be removed with gentle filing but be careful not to make the problem worse.
When moving down through the grades try to go in different directions, ie first grade sanded north/south, second grade sanded east/west.This helps to prevent deepening any scratches present.
This is the stem after finished sanding. It could have done with a bit more work.

Once you are satisfied that all the scratches have been sanded out and you have finished by using the very finest paper it is time to start with the polishing compounds.

Mark the buffs one with an R for rouge and the other with a T for Tripoli and don’t mix them up. Store them in a zip-lock bag when not in use to prevent contamination.
This photo is showing two cotton buffs but I now use a sisal for the Tripoli.
Stay tuned for Part 2 coming soon...

When building re-cycled bicycles of any description we often go to great lengths to ensure the final product is pleasing to the eye. Sometimes it’s the little things that make a huge difference so we buy new ones to create that finished shiny appearance.
I haven't done the costings but it is possible to clean and polish even heavily corroded components for very little outlay. For only one bike it may not be that cost effective if you have to purchase all the equipment but if you only have one item such as an electric drill then it becomes much more affordable and many dollars can be saved.
Tools required and safety hazards
- A bench grinder, the more powerful the better. There are many ultra cheap Chinese imports available but some of them are very wimpy. It is possible to stop the less powerful machines with the pressure used in polishing which is why a more powerful machine is better so get the most powerful you can afford.
- Two canvas, linen or denim buffing wheels.
- Make sure they are stitched around from the centre out to keep the layers from separating. I prefer a rough sisal buff for the Tripoli compound as its more agressive
- One tapered end spindle for the shaft of the grinder, they come in left and right hand threads. In practice one is sufficient, as you will have to wash the parts between polishing compounds so no time is saved by using a buff at each end.
- Tripoli cutting compound. This is used to remove sanding marks.
- Red Rouge polishing compound. I leave this step out as I've never found it necessary but it can improve the final finish.
- White Rouge polishing compound. This is the final compound that gives the ultra diamond bright shine. All three of these compounds can be found in lapidary or jewelry suppliers (check the yellow pages) if they are unavailable in your local hardware store. Australians will find them in Bunnings.
- Assorted sheets of emery cloth, from medium to ultra fine, ie. 200 to 1600 grit.
- You may have to change to wet and dry sanding paper for the really fine stuff. Just use what is available.
- Although not entirely necessary a wire wheel brush is a fast way of removing corrosion or rust first.
- A face mask and goggles are essential safety equipment. A lot of dust and black **** will be produced and you do not want it in your eyes or lungs.
If the original parts were anodised then this has to come off as well. Caustic soda solution (DANGER, BURNS FLESH) will do the job but Easyoff (or similar) oven cleaner is a tad safer. Both methods are messy.
Use the wire wheel on a drill or the bench grinder (I use a drill press) to remove all the paint, corrosion and other blemishes. Be careful on aluminium, as the wires will leave deep grooves which you can see in the picture if kept in one position for too long. If no wire wheel is available then use coarse emery cloth which in all honesty will do a better job but take longer.
The next bit is heaps of elbow grease. Go down through the grades of emery cloth from the coarsest to finest sanding till all the blemishes from the previous grade have been removed. Deep gouges are not possible to remove but most other damage is.
Heavy damage can sometimes be removed with gentle filing but be careful not to make the problem worse.
When moving down through the grades try to go in different directions, ie first grade sanded north/south, second grade sanded east/west.This helps to prevent deepening any scratches present.
This is the stem after finished sanding. It could have done with a bit more work.
Once you are satisfied that all the scratches have been sanded out and you have finished by using the very finest paper it is time to start with the polishing compounds.
Mark the buffs one with an R for rouge and the other with a T for Tripoli and don’t mix them up. Store them in a zip-lock bag when not in use to prevent contamination.
This photo is showing two cotton buffs but I now use a sisal for the Tripoli.
Stay tuned for Part 2 coming soon...
Tuesday, September 28, 2010
A random act, give it a try - Atomic Zombie builders forum
"A random act of kindness, it's like giving blood, if you haven't given in a while, perhaps it's time."
Read more: A random act, give it a try - Atomic Zombie™ Extreme Machines Builder's Forum

Read more: A random act, give it a try - Atomic Zombie™ Extreme Machines Builder's Forum
Monday, September 27, 2010
Mini MINI – the Scooter E concept

"The Scooter E uses an in-hub motor at the rear wheel powered by a lithium-ion battery which is recharged via a conventional socket using an on-board cable. Conventional keys are discarded in favor of a smartphone, which also becomes the display panel when slotted into the integrated dock."
Read about this cool new electric bike: Mini MINI – the Scooter E concept
Welding Magnets - Atomic Zombie™ Extreme Machines Builder's Forum
"I know it's a tool question but I posted one in a tool thread about an auto darkening welding helmet a couple weeks ago and still haven't received a reply!" Welding Magnets - Atomic Zombie™ Extreme Machines Builder's Forum
Sunday, September 26, 2010
Modifications to Wildkat recumbent plans - Atomic Zombie™ Extreme Machines Builder's Forum
"Hi, I am a total newbie, so be nice to me, I have just bought a set of plans for the Wildkat and two other bikes. I find the Wildkat very appealing and have started building.
What I am thinking is...
1. For simplicity, going to handlebar steering.
2. Instead of having a 2 piece top boom, just run one long piece, once again for simplicity."
Read more and join the discussion: Modifications to Wildkat plans??????????? - Atomic Zombie™ Extreme Machines Builder's Forum

What I am thinking is...
1. For simplicity, going to handlebar steering.
2. Instead of having a 2 piece top boom, just run one long piece, once again for simplicity."
Read more and join the discussion: Modifications to Wildkat plans??????????? - Atomic Zombie™ Extreme Machines Builder's Forum
Saturday, September 25, 2010
From everybody's favorite city by the bay..San Francisco - Atomic Zombie Builder's Forum
A shout out to all bike builders in the San Francisco area: From everybodys favorite city by the bay
Friday, September 24, 2010
Streetfighter tubing? - Atomic Zombie™ Extreme Machines Builder's Forum

"There are two main reasons why there is no "parts list" at the beginning of the plan.
1) Because the bike is often built around both your donor parts and body size, my "best guess" would probably get me in a lot more trouble than not having the list. Working out the required lengths using your own measurements will ensure you don't end up "2 inches too short" on your only length of tubing due to my "best guess".
2) Things like wheels, cranks, etc are obvious parts, and you are free to use whatever you have on hand. I do not use hard to find parts nor do I favor any brand, so I am not going to start listing part numbers as that would only make things more confusing.
I do not plan to ever create a cut list or a parts list for my style of writing because for the most part it would add nothing but confusion. I am not against others posting their cut lists or parts lists, but I am also not going to link to them as I have no way to verify them as "universally good" for everyone.
The difference between a bike made for a 5 foot tall person is going to have a vastly different boom length than one for a 6.5 foot tall person. Also, your donor parts affect angles as well as lengths.
I started the forum to allow a place for everyone to share info and get help, and to me that trumps a strict parts list and a "good luck" policy any day!
http://atomiczombie.com/plansfaq.html
Read more and join the discussion: Streetfighter tubing? - Atomic Zombie™ Extreme Machines Builder's Forum
My StreetFighter Quadcycle - Atomic Zombie™ Extreme Machines Builder's Forum
I went for a 3km ride and the attention it got was insane. Here are a couple of photos for you.
Read more and join the discussion: My streetfighter
DIY bike plans for $7.95 each - AtomicZombie.com
If you've been considering building your own bikes, now is the time to take the plunge. Over 30 do-it-yourself (human and electric assist) plans to choose from, including videos of the bikes in action:
- recumbents (short and long wheel base)
- quadcycles
- lowracer recumbents
- cargo bikes and trikes
- handcycle trikes
- kids' bikes
- choppers
- trikes
- tandems
- electric bikes
- electric scooters
- electric trailers
- trailers
- fun bikes, and more.
Purchase 1-2 plans for $16.95 each
Purchase 3-4 plans for $9.95 each
Purchase 5-9 plans for $7.95 each
Purchase 10+ plans for $6.95 each
There are also more than 20 free tutorials, including: rake and trail, bike hacking, bike chain basics, welding, freewheels, cranks and pedals, coaster brakes, making your own hubs, cables, brakes, headtubes, goosenecks, underseat steering, bottom brackets, derailleurs, SkyWalker tallbike, Granny's Nightmare chopper, SpinScooter fun bike, and more.
The Atomic Zombie builders forum is a family-friendly community of novice and experienced bike builders willing to offer advice and suggestions. We welcome new members. There's also a huge online builders gallery of homebuilt bikes - more than 1,200 and growing every day.
Visit us at www.atomiczombie.com and get building!
Making Trike Hubs Without a Lathe
First of all, I would like to thank all of those who visit our forum and help others with advice and offer their great tips and tricks. There have been two alternative ideas posted in regards to creating the hub flanges that I use on trikes and quads such as the DeltaWolf, Kyoto Cruiser, Street Fighter, Gladiator, and Lode Runner. One alternative to the machined disc is to cut the required flatbar or plate using the appropriate sized hole saw. The other alternative is to source out precision made washers of the appropriate size. Often these washers are called "fender washers", "dock washers", or "aircraft washers".
I would like to present another alternative to the machined discs that only requires the use of an angle grinder, and hand drill. This procedure takes about 2 hours for all four discs, and is very effective if you don't mind spending a little quality time with your angle grinder. Since the hub flanges required in the plans vary in size, I will not be posting measurements here, but the same procedure will work on all trikes that use the hub-axle system I have developed.

Figure 1 - Marking the flatbar for the disc cutouts
The flatbar needs to be at least as wide as the discs you plan to make, and the required thickness. This flatbar is very easy to acquire, and can often be found in the welding isle in many hardware stores. You will need enough material for 4 discs, which is the number of discs needed for a delta trike or quad. In Figure 1, I have traced two of the discs using a paper template that was made in Photoshop and then cut out. The traced circles are the same diameter of the flanges on the hub in Figure 1 because I am using the rim and spokes from a complete wheel that had this hub. The center of the disc must be marked and punched before any cutting, as you do not want to loose this center position. The punched center will later be drilled for the axles. Also, use a marker that can hold up to a little abuse as you will be grinding and handling the discs with gloves.

Figure 2 -Rough cutting the discs with an angle grinder
Figure 2 shown the discs being cut from the flatbar using a few straight cuts around the circumference with a zip disc. 8 or more cuts are made just outside the marker line so that final grinding does not take much time.

Figure 3 - Rough cut disc number one
After a few minutes of cutting with the zip disc, the part is liberated from the flatbar as shown in Figure 3. Notice how none of the cuts are inside the marked line.

Figure 4 - Using my "lathe" to make the discs round
My "poor man's lathe" is of course, my angle grinder! If you take your time and work around the discs, it does not take long at all to get them almost perfectly round. I think the angle grinder is like an artist's paint brush - learn to master it, and it can do a lot more than you might think. Since the discs get quite hot while doing this part, I work around half the disc, then switch it for another one until they are all rounded.

Figure 5 - Comparing the round disc
The disc on the right of Figure 5 has been rounded, and is so close to round that it looks like it was machined. Hey, if a person can carve out a beautiful sculpture from a block of wood using a chainsaw, a skilled garage hacker should be able to make precision parts using an angle grinder!
More of this free tutorial: http://www.atomiczombie.com

Upright TADPOLE trike? - Atomic Zombie™ Extreme Machines Builder's Forum
"Does such a thing exist? All the trikes that I have seen are the Delta design as uprights.
In theory it must be possible to mount two pairs of suspension forks at the front and maybe someone clever could make it lean to help steer?
Anyone seen anything like that?"
Upright TADPOLE trike? - Atomic Zombie™ Extreme Machines Builder's Forum
In theory it must be possible to mount two pairs of suspension forks at the front and maybe someone clever could make it lean to help steer?
Anyone seen anything like that?"
Upright TADPOLE trike? - Atomic Zombie™ Extreme Machines Builder's Forum
Thursday, September 23, 2010
Don't be afraid to build tadpole trike headtubes - Atomic Zombie™ Extreme Machines Builder's Forum
"In order to figure out the Center point steering geometry. ( see page 20 of the StreetFox plans ) I had to mount the tires. Brand new 48 spoke wheels with 14mm axles, but no tube liner.

So, a couple of layers of electric tape does the trick.

For added protection a Slime tube. ( with a florescent green cap )

Now I can take the measurements to figure the angle for Center point steering.

These StreetFox plans sure make it easy!"
Read more and join the discussion: Don't be afraid to build tadpole trike headtubes

So, a couple of layers of electric tape does the trick.
For added protection a Slime tube. ( with a florescent green cap )
Now I can take the measurements to figure the angle for Center point steering.
These StreetFox plans sure make it easy!"
Read more and join the discussion: Don't be afraid to build tadpole trike headtubes
Chopped BMX "Wizard" build - Atomic Zombie™ Extreme Machines Builder's Forum
"I did some work in Photoshop tonight to plan out the frame:

I should only need to add the small piece of steel which I colored red and steel to extended the forks. The black blob is the seat. Does the geometry of this look reasonable?"
Join the discussion: Chopped BMX "Wizard" build - Atomic Zombie™ Extreme Machines Builder's Forum
I should only need to add the small piece of steel which I colored red and steel to extended the forks. The black blob is the seat. Does the geometry of this look reasonable?"
Join the discussion: Chopped BMX "Wizard" build - Atomic Zombie™ Extreme Machines Builder's Forum
 | |
| www.chopzone.com |
Bike Rake and Trail Basics - free tutorial from Atomiczombie.com
Although the front end of a bicycle is quite simple compared to many other types of vehicles, there are certain subtle angles that can affect the way a bike or trike steers. A few extra degrees of head tube angle can make a ride feel "twitchy", or too much rake can create something called "wheel flop".
When building a bike from scratch, you may have to mess around with these angles in order to get your ride tuned exactly the way you like it, and you will quickly find out that there is no magic rule to getting it right without a little experimentation.

Figure 1 - A typical mountain bike

Figure 2 - Rake and trail defined

Short wheelbase recumbents, like our HighRoller pictured in Figure 3 have a wheelbase often close to that of a typical upright bicycle, so head tube angle, rake and trail are often close to the same typical measurements. When I built the HighRoller, I used the exact same head tube angle, rake, and trail measurements that I took from the donor cycle, and the ride is very smooth, even with no hands! The shorter the wheelbase, the more that head tube angle and rake seem to affect the ride, so be careful when making adjustments as sometimes only a few degrees in either direction will achieve the result you are looking for.

Read more about bike rake and trail - free tutorial: AtomicZombie.com
When building a bike from scratch, you may have to mess around with these angles in order to get your ride tuned exactly the way you like it, and you will quickly find out that there is no magic rule to getting it right without a little experimentation.
Figure 1 shows your typical hardware store mountain bike, which has what I consider "typical" front end geometry that often works well for many home built projects. Although a more relaxed head tube angle is better for a longer cycle, you can't go wrong using typical upright bicycle front end geometry as a starting point when creating your own frame from scratch. Your first test ride will give you more useful data than any technical frame building guide or chart ever will.
Figure 2 - Rake and trail defined
There are three angles of concern when working with bicycle steering, and they are shown in Figure 2. Head tube angle is shown (A), and is usually measured from a line taken parallel to the ground. A 90 degree head tube angle would be straight up and down, and a 45 degree head tube angle would be very relaxed, pointing your forks way out front like a chopper. Typical head tube angle on most upright bicycles is between 60 and 70 degrees.
Trail is shown (B). It is the distance between two lines drawn to the ground - one line extends through the head tube (the longest line), and the other is taken from the front wheel axle to the ground at 90 degrees. This measurement is called trail because the point from the front wheel axle to the ground is usually behind the point extending through the head tube to the ground. Excessive trail can cause a condition called "wheel flop" where the wheel seems to fall to one side while steering, causing your frame to lift off of the ground. Too little trail could create a "twitchy" feeling in your steering, as if every small movement created a large amount of steer in one direction or the other. A typical amount of trail on upright bicycles would be somewhere between 2 and 3 inches.
Rake is shown (C). It is the distance between the front wheel axle and the line extending through the head tube. In other words, rake is the distance your front axle is ahead of the forks. Less rake results in more trail as the point extending 90 degrees to the ground is pushed further behind the point extending through the head tube. Rake helps your steering system "self center", which is why some cycles can be easily ridden with no hands, while others with less rake need to be moving at higher speeds before going hands off.
Rake can be introduced anywhere on the front forks, and in Figure 2, it is done by placing the dropout on the front side of the fork legs. On many speed bikes, the forks are simply bent forwards at the ends to create rake.
Figure 3 - SWB recumbent front end geometry
Short wheelbase recumbents, like our HighRoller pictured in Figure 3 have a wheelbase often close to that of a typical upright bicycle, so head tube angle, rake and trail are often close to the same typical measurements. When I built the HighRoller, I used the exact same head tube angle, rake, and trail measurements that I took from the donor cycle, and the ride is very smooth, even with no hands! The shorter the wheelbase, the more that head tube angle and rake seem to affect the ride, so be careful when making adjustments as sometimes only a few degrees in either direction will achieve the result you are looking for.
Figure 4 - SWB recumbent front end geometry
The problem with Atomic Zombie videos - Atomic Zombie™ Extreme Machines Builder's Forum

"In a nutshell... they're TOO DARN SHORT! I love watchin' the vids of these rides, especially the ones I haven't built, but even the ones I HAVE built, as well!"
Read more: The Problem With AZ Videos... - Atomic Zombie™ Extreme Machines Builder's Forum

Wednesday, September 22, 2010
Square tubing for bike building, Brad, Canadians, anyone? - Atomic Zombie™ Extreme Machines Builder's Forum
"Where can I find a supplier for 1/16 X 2" & 1/16 X 1.5" sq tubing? I'm in PEI I contacted the supplier of last resort Linkletter's Welding LTD that all the welding shops pointed me to but to no avail.
"They had a listing for it in the catalogue and contacted their supplier. When I called back they said there was none in Canada." Read more and join the discussion: Sq tubing, Brad, Canadians, anyone?

"They had a listing for it in the catalogue and contacted their supplier. When I called back they said there was none in Canada." Read more and join the discussion: Sq tubing, Brad, Canadians, anyone?
Load rating for tires - Atomic Zombie™ Extreme Machines Builder's Forum
"Yep.... both trikes and recumbents have many advantages. Better weight distribution to the wheels and one more wheel. And the seating is as comfortable as my easy chair. I have a steel 10 speed.... awaiting it's conversion to a bent. I am sold on the recumbent trike. Although mentally I flip-flop between selecting a trike style vs tadpole style."
Read more: Load rating for tires - Atomic Zombie™ Extreme Machines Builder's Forum
Read more: Load rating for tires - Atomic Zombie™ Extreme Machines Builder's Forum
Hill Country Chopper - AtomicZombie.com builders gallery

I loved the Granny's Nightmare chopper concept. My version came out a little different, as the mountains here in WV require some extra gearing, good brakes, and full leg extension.
So, instead of bending the down tube I extended the chain stays (3/4" conduit, squared at the back) eight inches or so, thus altering head and seat tube angle and lowering the seat while maintaining full seat tube length.

I used a mountain bike frame with a triple-tree shock and kept the rear V-brakes so I could use a six-speed freewheel, with two rings on the crank so I can change ratios if I want. In the spirit of zombie bike recycling I used two side-pull caliper brakes to make a big chrome center-pull U-brake (see second photo) so I wouldn't need any cable housing for the front brake.
Thanks for a great site full of great ideas! ~ Ken Rice
A great looking Granny's Nightmare look-alike. Nice work, Ken!

Tuesday, September 21, 2010
Viking tandem trike - Atomic Zombie™ Extreme Machines Builder's Forum
"The shop floor is cleared (a major accomplishment in itself) and ready to see the beginning of the Viking. Picking up the steel for the frame on Friday and will start welding this weekend.
"Still hunting for donor bikes for parts. I see them everywhere when I don't need them but now that I am looking for them, they have become as scarce as hen's teeth. Found a local shop that specializes in new/used/custom bikes. They supposedly have an inventory of old frames and used parts. Going to check them out this weekend as well." ~ twilliamson, Atomic Zombie bike builder
Read more: Viking New Start - Atomic Zombie™ Extreme Machines Builder's Forum
 The Viking is a very unique tandem trike that includes an independent transmission system that allows one rider to stop pedaling without affecting the other. The Viking Tandem Trike uses commonly available 20mm disc brake hubs, so there are no hard-to-find or overly expensive components needed. The frame is completely made of square steel tubing, and everything else on the Viking Trike can be found at bicycle shops or hacked from scrap bicycles.
The building process is designed to allow anyone with a Do-It-Yourself desire to finish his or her own version of the Viking Trike without requiring previous bike building experience or specialized tools and skills. The plan is laid out in a format that makes customization or alternate parts usage a breeze, so you will certainly be able to include your own imagination in the process of building a recumbent trike.
If you have been eying up those expensive imported tandem trikes, but think $8,000 is a bit too steep of a price tag, then get out your tools and build it yourself! For thousands of dollars less than the price of a basic tadpole trike, you can create your very own tandem trike that will rival many of the factory built machines available.
"Still hunting for donor bikes for parts. I see them everywhere when I don't need them but now that I am looking for them, they have become as scarce as hen's teeth. Found a local shop that specializes in new/used/custom bikes. They supposedly have an inventory of old frames and used parts. Going to check them out this weekend as well." ~ twilliamson, Atomic Zombie bike builder
Read more: Viking New Start - Atomic Zombie™ Extreme Machines Builder's Forum

The building process is designed to allow anyone with a Do-It-Yourself desire to finish his or her own version of the Viking Trike without requiring previous bike building experience or specialized tools and skills. The plan is laid out in a format that makes customization or alternate parts usage a breeze, so you will certainly be able to include your own imagination in the process of building a recumbent trike.
If you have been eying up those expensive imported tandem trikes, but think $8,000 is a bit too steep of a price tag, then get out your tools and build it yourself! For thousands of dollars less than the price of a basic tadpole trike, you can create your very own tandem trike that will rival many of the factory built machines available.
Old school chopper - ape hangars & banana seat! Atomiczombie.com builders gallery

Name of bike: Ape Hanger
My name: Masor
Location: Santa Ynez, California

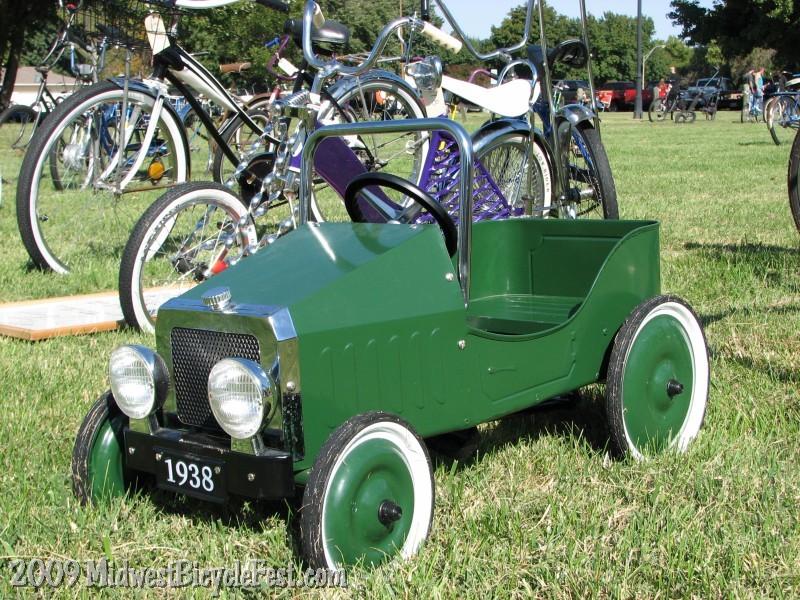
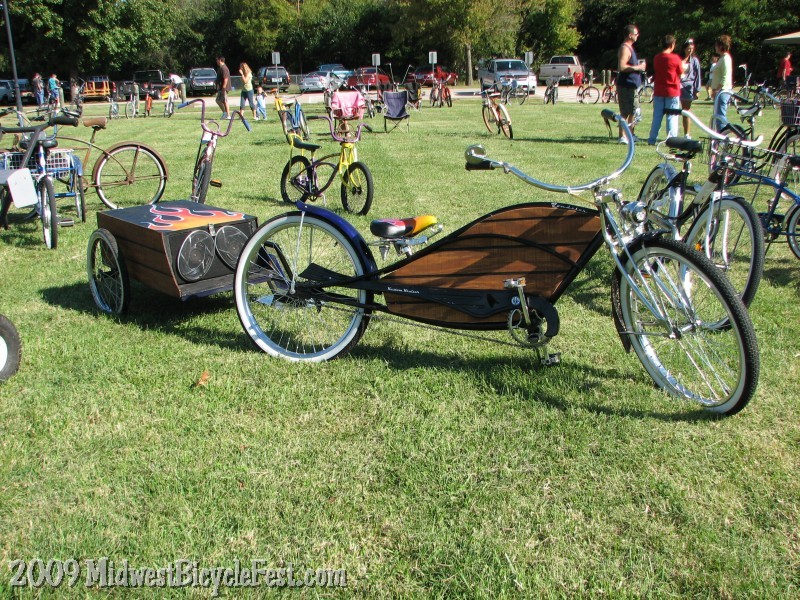
Midwest Bicycle Fest, Haysville, Kansas - Sunday, Sept. 26
Our friends at Coasters Bicycle Club sent us an email about their annual bike festival coming up this weekend. Hope it's another successful event. Looks like a lot of fun!

The Midwest Bicycle Fest is a free, family friendly event open to the public. Come show, view and ride bicycles of all types including Antiques, Choppers, Lowriders, Kustoms and the odd & unusual. Vote for your favorite bike. The winner receives the Peoples Choice award.

The Midwest Bicycle Fest is a free, family friendly event open to the public. Come show, view and ride bicycles of all types including Antiques, Choppers, Lowriders, Kustoms and the odd & unusual. Vote for your favorite bike. The winner receives the Peoples Choice award.
Visit http://locojoe.com/coasters/pages/mwbf.html for more information.
Monday, September 20, 2010
Hub flange option... - Atomic Zombie™ Extreme Machines Builder's Forum
"I went to my sheet metal/steel fab shop and asked if they could punch me some 2 1/2" ID disks from 1/8" steel. No problem -5 minutes later I had them. In fact they did not even charge me for the disks." Read more: Hub flange option... - Atomic Zombie™ Extreme Machines Builder's Forum

Subscribe to:
Posts (Atom)