Friday, March 30, 2012

Costa Rica choppers by Tintasangre

Hola Atomic Zombie!

I want to present Tintasangre's 2012 new bike projects and recycled bicycles public activities, and invite you to check Tintasangre5 YouTube channel handmade bike videos.

This summer has been very hot and sunny and perfect for bicycle outdoor fun:

http://www.youtube.com/watch?v=FTaaMUszudo&list=UU_WV9PO7zq1RFhSDld8z0iQ&index=2&feature=plcp

These are my new projects and bike experiments.
http://www.youtube.com/watch?v=9-w-8rNzGBQ&list=UU_WV9PO7zq1RFhSDld8z0iQ&index=4&feature=plcp

http://www.youtube.com/watch?v=5rW11i3zYr4&list=UU_WV9PO7zq1RFhSDld8z0iQ&index=8&feature=plcp

LA BANDOLERO RECUMBENT CHOPPER BIKE:


This is recycled bicycle, very fast to build. Combined a BMX frame with a MTB frame and Chopper Handlebar and tires (20" front w-24" rear w). My first attempt of this front transmission system. Built with garage materials for the test ride, but have to say this system is very stable (especially when compared with long fork choppers). The bike is very easy to ride. Most people of different sizes could drive it. This machine is a cross between a recumbent and a cruiser chopper bike.

www.youtube.com/watch?v=6thytJAEBhE&list=UU_WV9PO7zq1RFhSDld8z0iQ&index=1&feature=plcp

ANNUNNAKI CHOPPER BIKE:

This is a 2 week project, the fourth version upgrade of the former Clownbike.

The objective was to create a long, but still very comfortable sporty chopper. I tried to be very careful with the design line, composition, and color. This has become one of the favorites because of the feeling you get while you riding it.

http://www.youtube.com/watch?v=7txpkZB2kkU&list=UU_WV9PO7zq1RFhSDld8z0iQ&index=7&feature=plcp

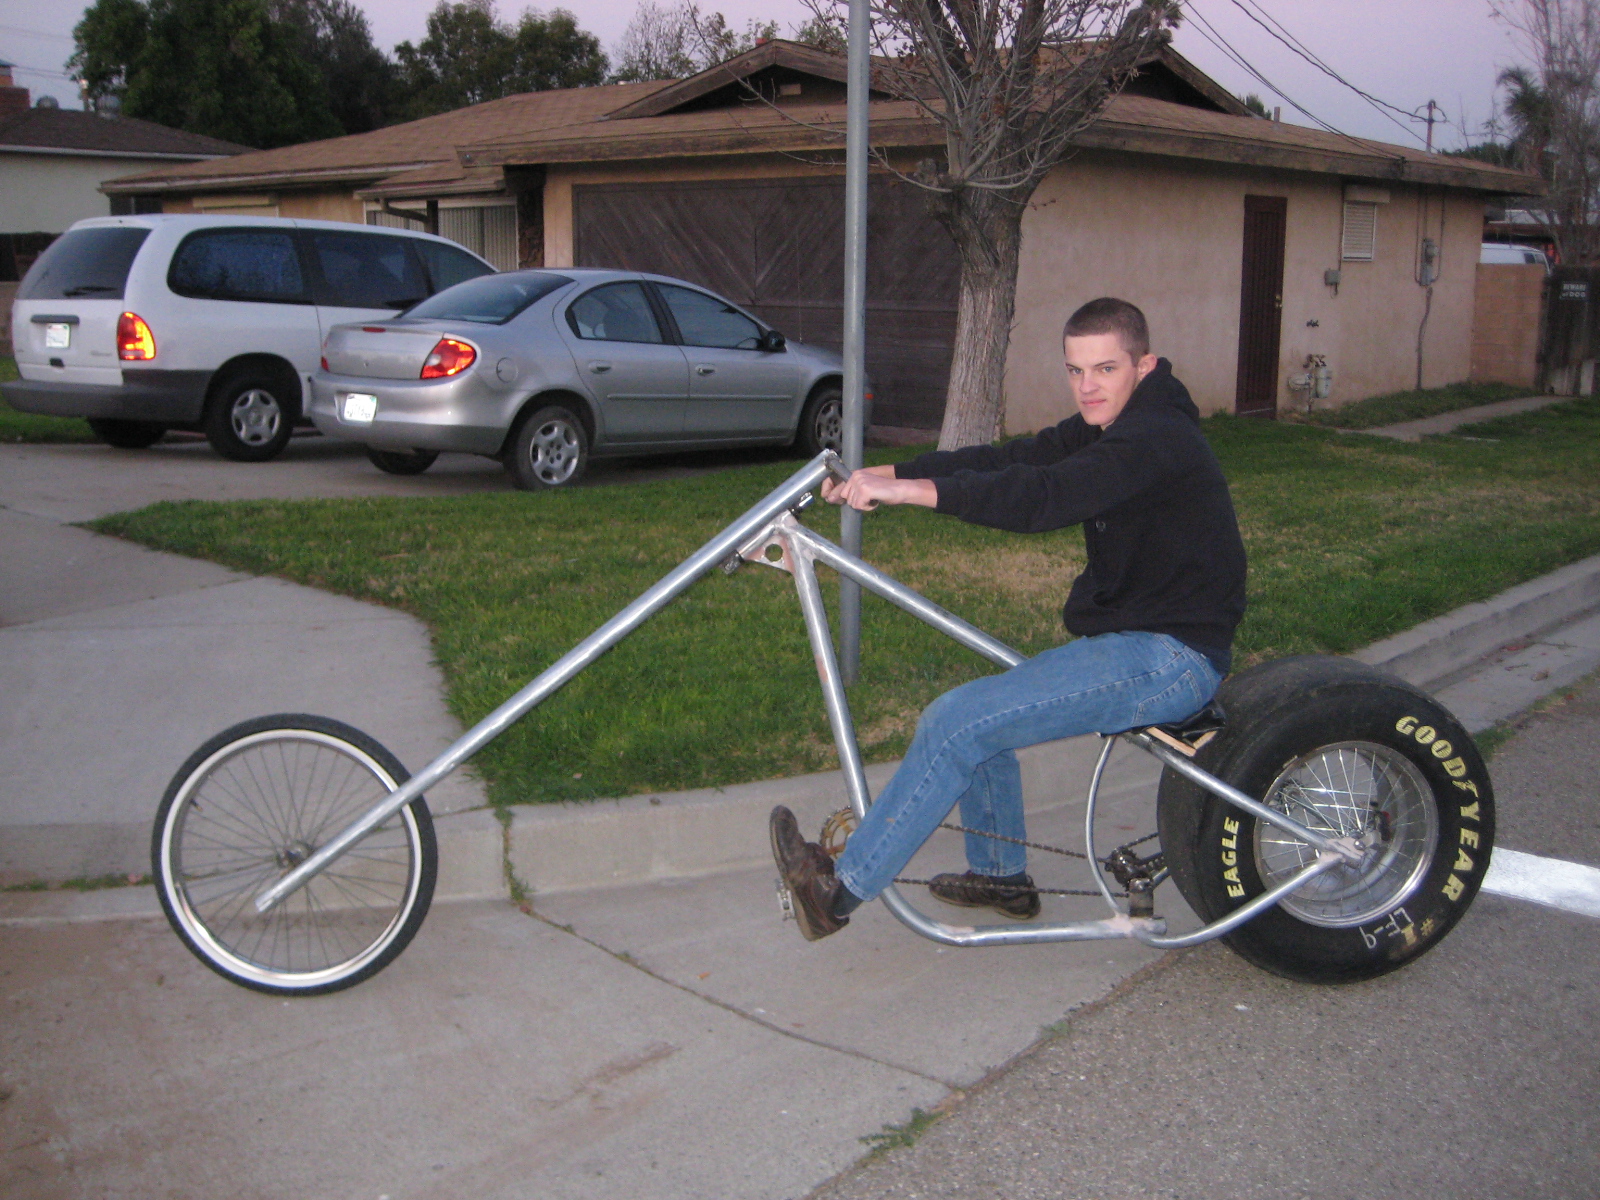
TINTASANGRE OVERKILL CHOPPER BIKE:
   
This Machine is totally inspired in the original ATOMIC ZOMBIE OVERKILL PHAT CHOPPER. A long time ago, I was dreaming to create this bike. This is my first experiment of the oversize car wheel drive system. I didn’t put bicycle spokes on it; just used the normal wheel, hacked the hub and centered with iron bars (this part took some time).

I made a 3 spoked front wheel, comfortable seat and handlebars, and cruiser-chopper angles combination. A very special thanks to Atomic Zombie for their web tips and motivation to go through this project!

http://www.youtube.com/watch?v=yQhi8wFqb-s&list=UU_WV9PO7zq1RFhSDld8z0iQ&index=1&feature=plcp

http://www.youtube.com/watch?v=E0KARETMgy0&list=UU_WV9PO7zq1RFhSDld8z0iQ&index=6&feature=plcp

http://www.youtube.com/watch?v=akBEAjGEbA4&list=UU_WV9PO7zq1RFhSDld8z0iQ&index=5&feature=plcp

It’s very nice to be in contact with you and all bike builders. Best Regards!

Erik Kaskant

Thank you, Erik, for sending us pictures of your new choppers. Amazing workmanship, as usual! Muchas gracias, amigo!


Wednesday, March 28, 2012

Connecticut Warrior tadpole trike


"Finished my project and I love it. Gonna do another one. Great plans.
Thanks, River."

Glastonbury, Connecticut


The Warrior Racing Trike takes performance and looks to all new heights. With triple disc brakes, under seat steering, and a general racing attitude, the Warrior would easily pass for an expensive production import. Built using inexpensive bicycle components and steel tubing, the Warrior weighs in at only 43 pounds, and has perfect handling and braking characteristics. There is not one single machined part on the entire trike, and everything can be built using only a basic welder, hand drill, and angle grinder!

The Warrior Racing Trike uses commonly available 20mm hubs, so there are no hard to find or overly expensive components needed. The frame is completely made of square steel tubing,and everything else on the Warrior Trike can be found at bicycle shops or hacked from scrap bicycles. The building process is designed to allow anyone with a Do-It-Yourself desire to finish his or her own version of the Warrior without requiring previous bike building experience or specialized tools and skills.

If you have been eyeing up those expensive imported recumbent trikes, but think $4,500 is a bit too steep of a price tag, then get out your tools and build it yourself! For thousands of dollars less than the price of a basic tadpole trike, you can create your very own racing trike that will rival many of the factory built machines available.

Take a look at our Builders Gallery to see other Warrior examples, including many creative modifications to the plan. Our international builders community ranges from students to retired engineers, but they all have one thing in common - the desire to build their own stuff!

All of Atomic Zombie Extreme Machines plans are downloadable PDF format. Multiple discounts, free tutorials, videos, gallery, newsletters, blog and more.

Tuesday, March 27, 2012

AZ newsletter March 26


Feature article by Brad Graham (Radical Brad): Photographing your DIY project
Freak tall bike
Ottawa chopper
Kitchener Warrior trike
Brazil chopper
Builders community chat
Mississippi chopper
Ottawa spinning big boy trike


Atomic Zombie DIY bike plans

Brisbane (Australia) Chopcycle build


"Hi All. Just thought I would put up some photos of the chopper cycle I am working on. Its nearly ready for paint but I was too focussed on building to post till now.

The idea was to build a chop cycle which looks as similar as possible to an old rigid frame Harley and using the atomic zombie plans as a base of course.

I'm not quite finished yet but only have the bobber seat (half finished) and the mudguard and maybe a sissy bar to go before paint. Anyway a picture is worth a thousand words they say so here goes."

More >> Brisbane (Australia) Chopcycle build


Monday, March 26, 2012

Ottawa handmade trike & chopper

"Remember those plastic big wheel toys, where you cranked on the hand-brake to spin out? Meet its big-boy cousin ! Just pull up on the blue handle and hang on. I also built it so that it detaches with no tools required, a simple hook and spring system holds it in place."

Rick Andmichael
Ottawa, ON

My son's 1st project. Code name "Forked-up".


Wednesday, March 21, 2012

Chopper crazy

Choppers are always popular with the DIY bike crowd. Whether they're made from scratch or tricked out rides with loads of bling, choppers are cool. Here's a selection of choppers that were recently added to the Atomic Zombie gallery.

Dave Moyer
Saylorsburg, PA.
 
John Kemper
Rialto, California
  
PAULO MARTINS
Sao Paulo, Brazil

Stella's Chopper.
PeterT, South Australia

Jaxon's (3years) 1st Chopper
Hartlepool, England


You can build your own cool, custom chopper bikes.


Another Canadian Warrior tadpole trike


Sitting out in the sun in this uncommonly warm Canadian winter on a walking trail in the middle of my city. I've named it the Warrior FS. Translates to "Full Spectrum".

Spinner
Kitchener, ON


Warrior Recumbent Tadpole Trike DIY Plan - AtomicZombie

The Warrior Racing Trike takes performance and looks to all new heights. With triple disc brakes, under seat steering, and a general racing attitude, the Warrior would easily pass for an expensive production import. Built using inexpensive bicycle components and steel tubing, the Warrior weighs in at only 43 pounds, and has perfect handling and braking characteristics. There is not one single machined part on the entire trike, and everything can be built using only a basic welder, hand drill, and angle grinder!

The Warrior Racing Trike uses commonly available 20mm hubs, so there are no hard to find or overly expensive components needed. The frame is completely made of square steel tubing,and everything else on the Warrior Trike can be found at bicycle shops or hacked from scrap bicycles. The building process is designed to allow anyone with a Do-It-Yourself desire to finish his or her own version of the Warrior without requiring previous bike building experience or specialized tools and skills.

If you have been eyeing up those expensive imported recumbent trikes, but think $4,500 is a bit too steep of a price tag, then get out your tools and build it yourself! For thousands of dollars less than the price of a basic tadpole trike, you can create your very own racing trike that will rival many of the factory built machines available.

Take a look at our Builders Gallery to see other Warrior examples, including many creative modifications to the plan. Our international builders community ranges from students to retired engineers, but they all have one thing in common - the desire to build their own stuff!

All of Atomic Zombie Extreme Machines plans are downloadable PDF format. Multiple discounts, free tutorials, videos, gallery, newsletters, and more.

Plans, tutorials, videos and more

Tuesday, March 20, 2012

AZ newsletter March 20


** Feature article by Brad Graham - Extending throttle for your electric bike **

Pennsylvania chopper
Spring into bike building
California OverKill chopper
Brazil OverKill chopper
Builders chat
Australia chopper
Wisconsin tall bike
Mini chopper in England


Saturday, March 17, 2012

Happy St. Patrick's Day


An old Irish recipe for longevity:

Leave the table hungry.
Leave the bed sleepy.
Leave the table thirsty.

Always remember to forget
The things that made you sad.
But never forget to remember
The things that made you glad.

Always remember to forget
The friends that proved untrue.
But never forget to remember
Those that have stuck by you.

Always remember to forget
The troubles that passed away.
But never forget to remember
The blessings that come each day.

If you're enough lucky to be Irish...you're lucky enough!

Thursday, March 15, 2012

How to build a phat ass chopper wheel - Part 1

Atomic Zombie's OverKill chopper


Let's face it, a chopper needs to have a wide rear wheel in order to stand out among the pack. In fact, the wider the better! I remember the days when a bicycle chopping involved hammering a cut off set of forks onto the ends of another set and then replacing the front wheel with a smaller diameter wheel.

Well, those days are history, and now a custom chop may involve a year of work and several hundred dollars of machined “bling” in the mix. Things changed about 10 years ago when department stores began mass producing these chopper bicycles with 4 inch wide tires, something that was not available before that time.

At first, I was thinking "cool, a new source of parts", but then I started seeing these cookie-cutter factory jobs all over the place, and they all looked alike. In fact, the only difference between these so-called "customs" was the color and the eight digit serial number. Seeing this sacred ground infected by the big box stores made me take drastic action, and I set out to make a chopper that would mock these department store bikes both in look and in cost. I wanted to blast the chopper proportions way out there and do it for only a few bucks, so I designed OverKill.

To spew insult at these 4 inch wide rear wheel departments store chops, I would have to go way overboard on the rear wheel, so I started looking at ways to fit a motorcycle wheel to a bicycle hub. After a few prototypes I realized that I was only a slight bit larger, having tires of 5 or 6 inches in width. I scraped the motorcycle wheel idea and went to the auto wrecker to scrounge up something bigger, much bigger.

After a bit of digging, I found an old steel rim with a 15 inch wide drag slick, and that formed the basis for the OverKill Chopper. After that, many other creative chops started popping up based on the OverKill plan, each with some amazing custom twist. Am I laying claim to inventing the car wheel chopper? No sir, but I would like to think I had a hand in putting these department store chops back in their rightful place - well behind the real custom.

So, let's have a look at how easy it is to whip up a phat rear wheel for a bicycle chopper. All you need is an old steel rim with a tire and some common bicycle parts. I didn't have room in this release to show the creation of the wide hub, so we will just start with the process of lacing the wheel, which is much easier than you might think.


Figure 1 - Getting ready to lace a car rim

At this point, we have the custom wide hub which is made from an old steel BMX hub and a set of 72 matching spokes. Why 72 spokes? Because the original hubs had 36 spokes and I drilled a second set of holes on each flange to double the number of spoke holes. This allows the creation of what is really 2 laced rims on each side of the car rim to offer both strength and a thick look to the finished wheel.

Spoke length is not important here, just use common spokes made for a 20 inch rim when you are lacing a 15 inch car rim, and they will fit. If you know something about lacing a bicycle wheel, forget it now because the technique used to lace a car rim is completely different and much more simplified.

Figure 2 - Adding the first two spokes

Start by handing the hub by two spokes as shown in Figure 2. These are both "inside spokes", meaning that you push them into the spoke holes on the hub towards the inside of the rim so that the round head is facing outwards. Spin the spoke nipple around two or three times to hold the spokes in place. Be careful when pushing the spokes around that you don't scratch the paint on your rim. The spokes are sharp at the ends and will easily mark up your new paint job if you are not careful, especially when getting the last few to bend into position.


Figure 3 - Keep adding more spokes into every second hole


Keep adding more spokes to the rim, but only in every second hole so each spoke pair has a blank hole between them. These spokes will all be inside spokes, so they are pushed into the holes towards the inside of the rim. You will need to add 36 of these spokes to the rim.

Only turn the spoke nipple a few times, and try to turn them all about the same amount.

Figure 4 - Turn the hub to remove the slack

Once you have one side completely laced with spokes, you will notice how loose they all are. Did we use spokes that are too long? Nope, this is all part of the plan, and if you give the hub a spin, you will see that the slack is picked up as the spokes begin to exit the hub at an angle. This can be seen in Figure 4, as I have one side laced and have the hub twisted to take up the slack in the spokes. Continue adding spokes to the other side of the rim in the same manner.

More in the February 27, 2012 newsletter  >>


Monday, March 12, 2012

AZ newsletter March 12


 *** Feature article by Brad Graham (Radical Brad): DIY chopper hub ***

 Charlotte's first bike
AZ chopper wheel kit
It's an Atomic Zombie life
Builders community chat
California chopper
    

Friday, March 9, 2012

My Photo Production Van Velomobile

 "Just about have the skin on the van. put the lights on but have not covered the head lights. I got to test ride today for about 8 miles. I wanted to see if I could run the batteries out. It went as fast as 30.5 mph, but I ran out of road. I still have no brakes on the rear. It stops really slowly.


The front brake is not enough. The wheels are not strong enough for the weight of the van, so I will lace the motors in a motor cycle rim. I found some with the same spoke count. The Test Ride went great. The one motor does good if you peddle on take off. After I get the other motor installed it should have great take off as well. After 20 mph the peddles do nothing"

More...My Photo Production Van. Velomobile


Charlotte's own bike

"Charlotte is a little person. She is four years old and wanted a "pedal bicycle" like her friends have, but no commercially produced bicycle comes close to being able to fit her.

So, we started with a bicycle with 12 inch wheels and rebuilt it. The changes are: seat tube and pedal cranks shortened, bottom bracket narrowed, rear stays shortened and reshaped, forks and steering head shortened, main tube replaced with a curved tube to lower step-over height and bring handlebars closer to seat, handlebars narrowed and reshaped, carrier reshaped. The only unaltered frame parts are the front axle dropouts.


The full construction is covered in this thread:
http://forum.atomiczombie.com/showthread.php?6214-Custom-fitted-bike-for-little-person

The result is a bike that fits Charlotte and retains good proportions. More importantly, it is a pleasure to see her riding her own bicycle,when at one stage this didn't seem to be possible.

Thank you for providing the forum and website where so many bike hackers can swap ideas and learn from each other. The world is a better place for it.

Regards,

Neville Whitlock
Grandad, Petone Bike & Velo"


British Columbia sidehacker chopper

"G'Day Y'all. This site is excellent. Now my friends can see I'm not the only one. Here's my latest creation. Not painted yet due it still being too cold hereabouts. Pagan Psycle's - The Long & Low sidehacker, from Sechelt, B.C., Canada, eh. Aloha, Steve."


Nice work, Steve. thanks for sharing.


Spring into bike building. AtomicZombie can help.


Wednesday, March 7, 2012

Spring into bike building with AtomicZombie

 
Discarded or worn out bicycles offer many good parts and can often be found at local scrap yards, city dumps, or yard sales for a few dollars. Even if you plan to build a custom creation using all new parts, this hobby will seem inexpensive compared to many, as you can purchase a brand new bicycle at a store for less than a hundred dollars.

The great thing about hacking and welding bicycles is that you will be working with all steel components, which are much stronger, more common, and much less expensive than high grade aluminum or carbon fiber bicycle parts. If you have never torn a bicycle apart before, then this basic introduction will show you all you need to complete a total bicycle autopsy in minutes, stripping an entire cycle down to the individual parts using only a few basic hand tools.

You can build your own recumbent bike, tadpole trike, chopper, velomobile, electric scooter, delta trike, quadcycle or tandem trike from our easy to follow plans. All of our plans are easily modified to suit your own needs and you can work with the materials you have on hand.

Combine the ideas presented in several plans into a unique home built recumbent bike, or create your own racing trike based on one of our DIY plans. The possibilities are endless!


Tuesday, March 6, 2012

It's an Atomic Zombie life


Here we are at the beginning of March and no sign of spring yet. Just when we thought the melting snow was a sign that we were in for some warmer weather, over a foot of snow dumped on us last week. You never know what surprises are in store at this time of year. The best part is the sun rises at 7 am and sets around 7 pm. I love it when the days get longer. Just itching to get started on something – gardening, bike building, videos, etc.

Goldfinch

I’m enjoying watching various types of birds at the feeders, many of which I’d only seen pictures of. Much more variety out here in the country. Every morning, the Blue Jays call me to fill the feeders with peanuts.  Spoiled birds!

They take turns with their cousins Whiskey Jacks (Gray Jays), and smaller birds – Hoary Redpoll, Goldfinch, Chickadees, Nuthatch – at the feeders, but when the squirrel shows up, the battle is on! Sometimes the birds manage to gang up on the squirrel and send it scurrying back to its nest.


Squirrel and Pine Grosbeak square off

Looks like we have at least a few more weeks of winter left, but in the meantime, we’re working on some new stuff for this year. Here’s a sneak peek at what’s coming up:

New Atomic Zombie web site. We’re about 75% done the site. It’s a complete overhaul. If all goes well, it will be online by the end of this month. It’s a huge project, but the end result is well worth it. 

New gallery. Forum members will be able to upload their own pictures, and maintain their own galleries. 

New videos. More DIY bike building tutorials and webisodes.  An exclusive look at your Atomic Zombie hosts Radical Brad and KoolKat and why they spend an insane amount of their lives promoting the AZ way of life.

New plans. Choppers, recumbents, trikes, maybe a velo? More on that later. 

New kits. Finally! We will be manufacturing parts to help with your bike building projects. 

AZ road trip. Will Radical Brad and KoolKat make an appearance at an event near you? Stay tuned.

So, as you can see, we’re planning a lot of new stuff. It will take up a huge chunk of our time, but with our new place and plenty of room to grow, we hope to keep you entertained and informed as we continue our journey.  ~ KoolKat