Wednesday, October 30, 2013

Bike builders newsletter online


Feature article by David Monk: Building the AtomicZombie Warrior Trike

Parts for your bike projects: axle adapters, disc brake adapters, hub flanges, head tubes and bottom brackets

Bike builders community: Hot topics and intriguing conversations.
Bike builders gallery: New additions. Upload your own photos.
Bike builders feedback: We love to hear from you.

Free DIY tutorials: Many in PDF format
AZTV webisode: There and Back Again: A Zombie's Tale

This and archived newsletters are here.

www.AtomicZombie.com

Thursday, September 12, 2013

The HammerHead Winter Trike

hammerhead winter trike
Hammerhead winter trike


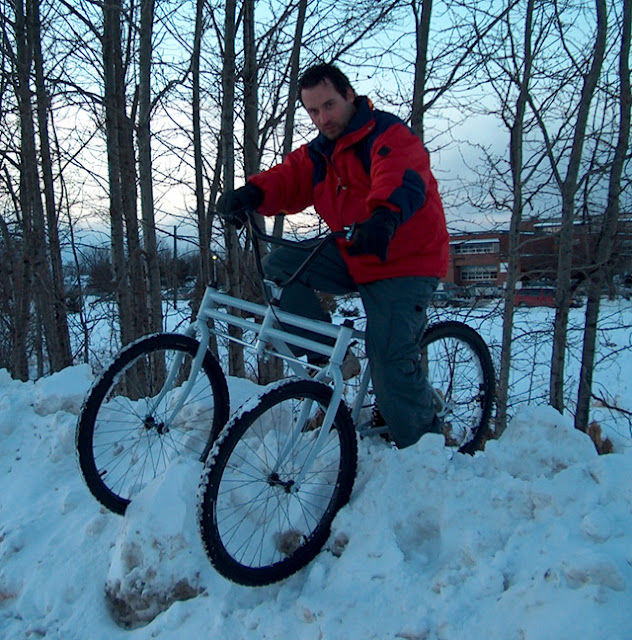
This simple DIY project is designed to inspire you to build a bike to conquer a typical winter climate with snow, ice and slush. The Hammerhead is a two-headed monster that eats snow and ice for breakfast, and has no fear of Old Man Winter or his frozen wrath.

I designed this two headed bike to give myself a way of staying in shape during the winter months. I used to take my fancy, overpriced mountain bike out for winter rides, but soon realized that it wasn’t suitable in deep snow or around icy corners, and the bike was taking a lot of abuse every time I bit the dust (snow). 

Obviously, a three-wheeled bike was necessary to maintain balance, so I rebuilt one of those old-style trikes (the kind with two wheels and a big basket in back) and tried to make it as light as possible by removing all parts that weren’t needed, and then added some knobby tires for better traction. The results were very disappointing; not only was this bike as heavy as a tank, but it also had no traction at all. Because that style of trike only drives one of the rear wheels, it mainly just spun around on most surfaces except bare pavement. Adding a differential (a gear system to spin both wheels and transfer power between them) was just too complicated and would add even more weight, so I decided to scrap this type of approach.

My new plan was to have two front wheels for stability and one rear driving wheel for traction. The two wheels up front (tadpole style) design is popular on low-slung recumbent trikes, making them very fast and comfortable, but it is not a suitable design for a winter bike for several reasons.

First, you don’t want to be slung two inches from the slushy ground while winter riding because you will get very wet from wheel spray.

Second, most people driving motorized vehicles will not normally expect to see bicycles in the winter months, so you want to be as visible as possible. A low recumbent trike is not very visible to drivers of motorized vehicles.

Third, is road salt. If you live in a community that routinely uses salt on roads and sidewalks, then this is a problem because salt will corrode metal. Why spend so much and money on something that will require many custom-made parts, and will end up rusted at the end of the year?

Hammerhead is not only as high as a regular bike, but it needs only regular bike parts and a little welding here and there. The design uses a regular mountain bike with two head tubes welded on each side of the frame in order to support two sets of front forks and wheels. Both wheels steer at the same time just like skis on a snow machine. In fact, the steering linkage that I scavenged is from a snow machine!

The trike is called Hammerhead because I thought the finished frame looked something like a hammerhead shark. You see it too, right?

Parts You Will Need

Now that you have a plan and a desire to conquer winter, let's start by gathering some parts. As shown in Figure 1, you will need a complete mountain bike (stripped down to the frame), two front wheels, two head tubes (ground clean) and a matching pair of front forks. The critical requirement here is that both head tubes, forks, and front wheels be identical or very close in size. Even the tires should be the same, as any mismatch will cause the final bike to be uneven and wobbly.

bicycle parts for the winter trike
Figure 1 — Gathering parts for the Hammerhead trike.


The first step is to create the two head tube extensions. Each head tube is welded to a pair of 12-inch lengths of one inch diameter thin walled electrical conduit, or similar bicycle frame tubing. These two tubes are then welded to each side of the original head tube on the frame. Both tubes are welded at exactly 90 degrees to the head tube, as shown at the top in Figure 2.

If the original head tube is not as tall as the two new head tubes, position the new extension tubes so that they are able to mate to the original head tube. To make a good weldable joint, fishmouth the ends of the tubing to conform to the round edge of the head tube as shown in the lower part of Figure 2.

Weld carefully, tack welding only at first to ensure that the two tubes end up at 90 degrees to the head tube. Any error here will result in a front wheel misalignment, so check the angles with a 90 degree square as you work. Look ahead to see how the extension tubes will place the two new head tubes at the same angle as the original head tube and at 90 degrees to the frame tubing.

hammerhead trike has two head tubes
Figure 2 — Creating the two head tube extensions.


When you have both head tubes welded to their two 12-inch tubes, it’s time to weld them to the original head tube on the donor frame.

As shown in Figure 3, the extension tubes are welded to the original head tube so that all head tubes are at the same angle and so that the extension tubes are at 90 degrees to the frame tubing. You want each head tube to end up at the exact same angle as the middle head tube so that the caster angle remains the same as it was on the original bike. If you imagine two identical bikes standing side by side, then you can picture what we want here.
At this point, just make a few good tack welds around the joint to secure all of the pars together. A final alignment check will be made by installing the forks and front wheels to compare them with each other.

align the head tubes
Figure 3 — Weld the head tubes so that all three align.


To ensure that the two head tubes are aligned with each other, put the bearings, rings, and forks on both sides and then install the two front wheels. Remember that both front wheels must be the same diameter, which is why both tires should be the same type. When you have both wheels installed, stand up the bike and place both forks in the straight ahead position for a visual inspection. With the parts only tack welded, you can probably make slight alignment adjustments by tapping with a mallet.

Once you are certain that both head tubes are aligned, weld around all of the joints, following the same order on both sides so that any distortions happen equally.

check fork and wheel alignment
Figure 4 — Checking alignment using the front forks and wheels.


To make this frame structurally sound, a set of trusses will be added to the front in order to triangulate the frame. The frame is somewhat rigid as it sits, but any hard force to either front wheel could bend the frame at the joint between the head tube and the new extension tubing.

With some simple trussing, we form a triangle on each side, making the frame extremely strong. Any tube with a diameter between half an inch and 1 inch will do for the trussing. I found some old lawn furniture with 3/4 inch tubing and cut a few pieces to make the trusses.

These trusses are welded from the top of each head tube to somewhere near the middle of the top tube on the main frame. The trussing should be installed a few inches head of where your knee will be when you are pedaling the bike. To find this spot, put on a crank arm and set the seat to your height, then mark it on the frame while you pedal. The main goal is to make sure your knee does not hit the tube.

truss tubing increases frame strength
Figure 5 — The truss tubing makes the frame very strong.


Stay tuned for more on this project. Part 2 coming soon.


AtomicZombie bike plans


Tuesday, September 3, 2013

Bike builders news


September 3 - AZ newsletter online

Feature article by Erik Brohaugh: Sussex to Sabi: An African long tail cargo bike is born

Parts for your bike projects: axle adapters, disc brake adapters, hub flanges, head tubes and bottom brackets

Bike builders community: Hot topics and intriguing conversations.
Bike builders gallery: New additions. Upload your own photos.
Bike builders feedback: We love to hear from you.

Free DIY tutorials: Many in PDF format
AZTV webisode: There and Back Again: A Zombie's Tale

This and archived newsletters are here: http://www.atomiczombie.com/NewsLetters.aspx


www.AtomicZombie.com

Friday, August 2, 2013

Human powered helicopter


It was great to hear that the Sikorsky challenge has finally been conquered. This challenge was put forward by the Sikorsky Aircraft Corporation way back in 1980 offering half a million smackers to anyone who could create a human only powered craft that would hover stationary in a space of no more than 30 feet x 30 feet for a minimum of 60 seconds at an altitude of at least 10 feet. Anyone who knows something about air flight will tell you that this a huge challenge, pushing the absolute boundaries of what is considered possible.

But, in July a Canadian team (Aerovelo) at the University of Toronto comprised of students, staff, volunteers and professionals claimed the prize with their human powered copter called “Atlas”.

The amount of engineering and trial and error that went into designing and building the ‘copter is daunting. Here are some impressive specs of the machine:

Rotor Radius: 10.2m (33.5ft)
Maximum Dimension: 46.4m (154ft)
Height: 3.7m (12.1ft)
Overall Weight: 55Kg (121.4lb)

Can you imagine what it takes to spin up a four 33 foot blades and lift yourself plus the 120 pound machine into the air, at the same time controlling the flight in three dimensions? WOW is all I can say!


Atlas ready for the winning flight

When you see the entire copter sitting there on the ground, you can really appreciate the engineering that went into making such a huge machine only weighing 120 pounds. The framework is made of composite rods and wire, so it is lightweight and just strong enough for the task at hand. The team went through many design changes over a year as they worked out the limits of the framework, snapping tubes and breaking many support wires along the way.


The Atlas transmission system


Everything about this craft is cool! Here is a shot of the transmission system which includes a high RPM fixed gear rear wheel that acts as a dampening system to smooth out the pilot’s pedaling efforts. This makes sense because there is little power at top dead center during a crank revolution that would lead to slowing of the rotors and would probably cause huge oscillations in the frame and massive power loss. This flywheel keeps the power output constant without really storing any energy and that would break the rules of the contest. On the left side of the crank, there is a set of pulleys and guide idlers that transfer power via cable to the rotors. Cable drive is necessary because a chain of that length would weigh too much. Check out the huge chainring; there must be 80 teeth on the beast!


The cockpit?


The pilot sits atop a carbon fibre road bike frame that is suspended in the main frame by wires. Craft control is accomplished by rods attached to what used to be the brake levers. I have not seen much detail on the control system, but would I imagine that it works by simply flexing the frame so that the pilot can change the angle of the rotors slightly to fine tune position while in flight. According to the rules, they have to stay within a 30 foot by 30 foot space for one minute.


One of the rotor flywheels


Every part of the craft is made using the lightest possible materials. This required some seriously detailed work from the team. The picture above is one of the four rotors, a huge spoked wheel made of composite materials and wire for spokes. If you think that lacing a 36 hole bicycle rim is a chore, just imagine making this wheel!

So, a big AtomicZombie congrats to Team Aerovelo for rising to the challenge and pressing forward after many broken frames, snapped wires and crash test flights! A lot more info on Team Aerovelo's Atlas craft can be found on their website here: www.aerovelo.com

~ Brad

Wednesday, July 31, 2013

A unique highway lowracer

A big wheel forkless lowracer


Even though my bike building has come to a bit of a halt this year, that doesn't mean I’m not coming up with new ideas on a daily basis.  A few times a day, I like to find a quiet place to relax with a notebook and sketch up new project ideas. I have really missed my Marauder. I think it may be time to make another long wheelbase lowracer so I can get out once in awhile to feel that burn as I push both machine and engine to the limits. The terrain out here is not the same as the city, so my lowracer will need to have suspension to take me down the gravel road out to the highway. There isn't much traffic on the paved highway around here and the ride would certainly be challenging thanks to hills and tight corners.

Another option is to transport it to a nice stretch of country road about 15 minutes from here where there is very little traffic and fairly smooth straight terrain. There are many cyclists using this stretch. I can just see myself eating roadies up once again as I slip under the wind and pass them one by one!


Some forkless bike examples


This time though, I want a very unique lowracer that has 700cc or 26 inch wheels on the front and back, a rear suspension, over seat steering, and no front forks. Yep, you read that right, no front forks! I have two designs for a forkless bike: one with a hinged triangle and the other with a wrap around frame that allows the front wheel to pivot much like the front wheels of a quad or tadpole trike.

Having no fork over the front wheel would mean that a larger wheel could be used without obstructing the pilot’s view. This will also smooth out the ride, so it would be a decent chassis for an aerodynamic fairing, allowing the rear suspension and long frame take up the bumps. Suspension is a must on a faired lowracer since these things can easily reach automobile speeds, making the smallest bump feel like a pothole. The forkless design and long wheelbase configuration also keep the front of the fairing low so that you can see the road ahead rather than having to peer around the body. This type of streamliner would not be all that great for pack racing on a track, but out on the open road, it would be a real blast!


A crazy pivot fork bike


The easiest forkless design is shown in my sketch and in these cool examples, where the hub pivots on a kingpin held in place by a single tube that wraps around the wheel, leaving space for the turn. I would run a connecting rod up to a control arm just behind the front wheel and then use dual cable steering to get around the curved tube so that there would be less flex in the system and tighter side tolerances for a fitting into a full fairing.

My other version involves a hinged triangle with the pivot very low behind the wheel to keep the tiller effect minimal. I have tried this in the past on this crazy ride called "Tour De Hell", but the result was a bike that had serious bad attitude and took a lot of practice to ride smoothly.

Of course, having a short wheelbase and a huge amount of tiller, this bike steered like a front end loader, swinging from side to side and causing serious steering feedback. I think this system would work out on a long wheelbase recumbent if the pivot had more caster and was placed much lower to get it closer to the axle. I am not sure if I will actually try the pivot fork design since the other method would defiantly work as expected.

Perhaps this winter I may cut some tubing and lay out my new forkless highway lowracer. I always wanted to build a long wheelbase lowracer and then go all the way on a fiberglass fairing so I can get out and push the limits of what is considered possible under human power. I certainly won't be heading to Battle Mountain to race with the big boys of speed, but I would certainly have fun smoking past road bikes doing 50 MPH on a faired lowracer down our country roads!

~ Brad


Tuesday, July 30, 2013

No summer this year!

More rain - what a surprise!


Well, it's official - this has now been the worst summer I have ever experienced in all my time on this planet! I have a total of five days of bike building time in since the snow melted and will be officially throwing in the towel this year. Normally, I can get three to five bikes out in a year, but this year will leave us with only one new bike plan, the Transporter Cargo Bike. Now, it may sound like I am giving up too soon, but with the fact that it rains almost 90% of the time here lately and the fact that I have oodles of yard work to get done mixed in there with a 10 hour work day, it's not lookin' too good, eh.

There have been some cool lightning storms this year which is pretty typical, but the rest of the time has been spitting rain every hour or so. I would rather have a massive downpour for hours and then some clear skies for a few days, but this year it has ALWAYS, ALWYAYS, ALWAYS been raining just a little. This makes it like a swamp down the hill in front of my bike building shack, and since I have to work and photograph projects outdoors, it is impossible. It's just enough rain to stop me. And, I have given up falling for that stupid "20% chance of rain" lie they tell on the weather network because what that really means is spitting rain every three hours so you can't work outside, Suckah!, bwa ha ha ha ha!


The line snapper after a good wind


Another thing that is happening around here is intense bursts of wind. Now, I'm not talking about a nice summer breeze, I mean tree-snapping, furniture-flinging, tent-collapsing wind. This unnatural weather amplification downed this old +80 foot tall tree at the corner of our yard and it snapped the hydro line with such force that it broke a hydro pole in half down at the bottom of the hill. The good news is that I wanted to clean up this part of the yard and we now have a woodstove, so free firewood!

Being a noob at cutting wood, I took my brand new chainsaw and worked on this monster tree for three days, getting what seems to be at least a cord of wood out of it. But after a week of use my chain seems dull. Is this normal for a chainsaw? Hmmm...at that rate I might as well look for a huge bow saw and spare the hassle of fiddling around with mixing oil, bar oil, dull blades and all that noise.


This will be my view for the rest of the year


So, instead of fooling myself into believing that I may actually get to build anything this year, I have decided to work on adding some useful stuff to the AZ site. We will be starting the new welding, grinding, and bike hacking tutorials /DVD production soon and I am dedicated to adding all kinds of bike tech calculators to the main site. I want to hear from our community and get a list of suggestions for making online calculators.

I am working on the following calculators and converters: tubing weight, metric/imperial, spoke length, Ackermann steering, chain length, rake & trail, and gear ratio.

If you have an idea for an online calculator, please suggest it in the forum: http://forum.atomiczombie.com/forumdisplay.php/189-Conversions-calculators-amp-more
That's all that's new here. I am looking out the window and guess what, it's gonna rain again soon!

~ Brad


Friday, July 26, 2013

The time and space conundrum

Our basement before any renos were done


Time and space are those two things that have always managed to stump the world's greatest thinkers, leaving us to the stark realization that we are but visitors on this rock, hurling through time and space at 66,000 miles an hour, tethered to a burning sphere by an invisible force in an unfathomable universe. This most of us take for granted, while refusing to believe these forces have any more effect on us than a butterfly beating its wings halfway around the world.

Yeah, I stole that quote from the X-Files and my mention of time and space here is under a different context, a more literal one; most of us need more free time and a larger space to work in! I am constantly trying to find more room for my junk (priceless parts collection) and at the same time store my creations, but there is never enough room, so often bikes are recycled for parts after a year or two. This constant shuffling of stuff then leads to my ever present lack of time, and often I just let things pile up and work around the mess since a full cleaning would take most of the day away.

After we moved into a single wide modular home, I knew that my indoor workspace would need more a lot more room; it was time for some basement renos. I have a fair collection of electronic bits for my work, so storage space and workbench room are very important. I decided to turn one end of the basement into a lab. It's always fun to share photos of our workspaces, and since I have blogged about my old bike building shack down at the bottom of the hill, I thought it would be fun to show the space I am occupying as I write this now. The lab!

Anyone who has been in a modular home knows that they are 16 feet wide and long, really long! We decided to custom design the modular to sit on a full 9 foot basement so that we would double our space and end up with huge windows, making it seem less like a basement and more like a split level. The engineered trusses are great because all of the ductwork is out of the way, 9 feet about the floor level.

All of my electronics parts, robot bits, and good bike parts ended up in the basement, since we have very little outdoor storage space. The AZ parts orders are also packed down here on the brown table. There is a decent amount of space here, but I have not had much time to organize it or do any work. I did however, get to complete my new lab recently and am typing out at you from it right now.

Working with wood instead of steel


When you are a DIY type, it doesn't matter what materials or tools you are using - you just measure three times, cut once and adapt along the way. Working with wood is certainly easier than steel, but doing a proper renovation does take a lot of research into code. Living in a Northern climate and having a 5 foot concrete wall with a 4 foot stud wall on top took some amount of planning in order to get the insulation done correctly. I had to build another 2x6 wall an inch ahead of the concrete wall and create an air barrier on the cold side then a vapor barrier on the warm side, keeping to an R24 insulation value.

Sure, I know what I am talking about now, but when I started, I didn't know the deference between an air barrier and a moisture barrier. A moldy basement was not something I wanted, so I did my research. The secondary wall took out about a foot from the width of the room, but it still ended up being 14x16, and that was certainly enough room for me to work on my technical projects and plan writing.

My new lab partially completed


I continued the secondary wall up to the top, added a suspension ceiling, lights, lots of electrical and then put down a waterproof composite floor that looked like hardwood. I was quite happy with the final results, considering much of the things I did were new to me. I still need to finish building the cupboards and workbenches, but I am quite comfortable on the temporary tables and have plenty of room to store my stuff.

So, if time permits, I will once again expand my space, enjoying the rewards of DIY and learning new skills as I move along.  No doubt, if you are the type of person who would build a bike, you probably enjoy other DIY projects as well around the house and yard. DIY is a way of life!

~ Brad


Human-powered hover bike wins coveted $250K prize

Wow! What an accomplishment by the University of Toronto team!

A long-elusive aviation innovation prize that has never had a winner in its 33-year existence has finally been claimed after a team of Toronto engineers built and then flew a human-powered hover bike.

Full story:  Human-powered hover bike wins coveted $250K prize

Thursday, July 25, 2013

Bike stuff to get done in 2013


It's been a busy year for me so far, with little time to get into bike projects. As many of you know, AZ is a spare time venture for us, so my garage time comes when yard work is done, when the weather is good, and when our day jobs are not running on overtime. Lately, free time has been sparse.

So, in order to utilize this scattered free time I have had lately, a new plan of attack has been laid out that will keep me in the garage hacking mode and add some new stuff to our site.

We have decided to start on an in-depth series of tutorials that will also become mastered into a DVD set for those who want to watch them on the big screen. We will cover welding, grinding and general bike hacking from beginning to end so that anyone can jump into this great hobby and learn everything needed to create a successful project.  All of the tutorials will be available for free on our Tutorials section, and the 3-part DVD will be offered for sale just like a plan.

I am also working on a bunch of online calculators geared towards the things we do, so you can just plug in your numbers and get the answers to common problems such as measurements, spoke length, gear ratios, tubing weight, wind resistance and other useful calculations. If you have any suggestions for an online calculator, then stop by our forum and make a suggestion. We would like to make AZ the ultimate place to be for creative bike builders!

Saskatoon berries calling to be picked


With all of the rain we have had lately, my favorite summer time berries have finally arrived. Saskatoons are a sweet berry that seem to fall between cherries and blueberries on the taste scale, and they so are abundant around here that a single tree out of the dozen in one field could fill a barrel. I like them so much that I often skip lunch and just head out to the trees to eat like a bear! The crab apples are also coming along, and they will be replacing the 'toons about a week after they all dry up. Oh, and don't forget the raspberries; they are soon to arrive as well. This is a tasty place to live.

Ok, I will keep it short this morning as I am going to start coding those online calculators and hope to have something to show this week. Wish me luck; I am about to dive deep into web coding again and do battle with a foe that makes Murphy's Law seem tame!

~ Brad


Tuesday, July 23, 2013

New Plan Online - The Transporter Cargo Bike

The Transporter Upright Cargo Bike

Well, it's finally online! The Transporter Upright Cargo Bike is the latest addition to the AZ plans page and is ready for download. It has been a real battle trying to find a few hours between the rain to get the bike photographed, but the weekend played nice for an entire day. I had fun moving some cargo around the yard and down our windy, hilly dirt roads and everything worked perfectly.

This plan takes a typical department store mountain bike or road bike and converts it into a rear loading cargo bike, leaving the front section of the bike in its original form. By keeping the part bike mostly unmodified at the front, the ride and stance is much the same as any bicycle, so you can head out into traffic and maintain eye level with those gas guzzlers.


A typical yard sale mountain bike


This plan is highly adaptable to your needs, and includes a rugged frame that can carry many different types of cargo carrying systems. The Transporter can be made to practically any wheelbase and the entire plan only requires standard bicycle components and a few lengths of round or square tubing, so it will be an inexpensive and straightforward build. I opted for a flatbed cargo top since I intend to move some large items around such as firewood and potted plants.

Testing the brakes down our hill


I loaded some heavy cargo and drove the bike down the steep hill up to our driveway for a brake test. Even using only the front disc brake seemed to offer adequate stopping power, and the handling was good. The only learning curve was getting used to the wide turning circle of a bike with an 8 foot wheel base. I did manage to get it turned around in the width of our narrow dirt road, but did use the entire road to do so. For typical navigation, the bike handles just like a regular cycle.

Blending in with the wildflowers


Our field is just bursting with color these days thanks to the rainforest-like climate over the last few months. Normally, the wildflowers bloom in shifts of yellow, white and then purple, but this year they are all here at the same time. I rolled the Transporter over to the edge of the yard and got some great shots of the bike contrasting against the rolling blue and white sky and the matching yellow in the field. I think photographing a bike is almost as fun as riding it, and I enjoy trying out different backgrounds to set the mood of the shot.

Well, there you have it, another plan completed. We are now turning our focus towards a set of highly detailed welding, grinding and bike hacking tutorials which will be part of our tutorials page and offered for sale as a complete DVD as well. I should be able to do most of the filming under the non-leaky section of the old trailer, so the rain will not get in the way this time.

~ Brad


Friday, July 19, 2013

Bike builders news July 19


 Feature articles by RadicalBrad of AtomicZombie.com:   
Transporter Cargo Bike is done - this project has been challenging
Paper, Proto, Plan, Precipitation! - the design and build process

***

Head tubes and bottom brackets for your bike projects - in stock
Freewheel axle and disc brake adapters - for your bike projects
Chains and brake cables? - let us know what you think  

*** 

Bike builders community chat - hot topics of conversation     
 Bike builders gallery  new additions - recumbents, trikes, choppers & more    
Builders Feedback - we love to hear from you.

***  

Free DIY tutorials - many in PDF format
AZTV webisode - There and Back Again: A Zombie's Tale 
  This and archived newsletters are here.

*** 

Thanks for your feedback, and keep those suggestions coming. 
  
See you in the Builders Forum. 


Like us on FacebookFind us on Google+

Visit our blog

100 million volts and an un-ridable scooter

Lightning and propane - not so good! This picture was taken after dark.


Last night was yet another typical example of the weather around here for the last two months - torrential downpours followed by non-stop lightning. Is it just me or has the weather really changed over the last few years? Everything is much more intense it seems, with more snow, more rain, more heat and more cold. Global warming? Yeah right, maybe in the summer, but winter around here is worse than ever. I would like to propose a new term for this wild shift in weather - "Climate Amplification". Things are not hotter or colder; they are just more intense.

But, I did have fun with the camera last night.


A very intense strike at the back of our yard


The lightning flashes were so intense and so often that it was easy to capture them with a camera. Odd, when I was younger I tried so many times to get just one photo of lighting but never could and now I can get 50 good shots on two days out of a typical week. Perhaps my next project should be a giant high voltage capacitor that can store 100 million volts and then convert it to a lower voltage for later use. Hmmm...as some of you might know from this project, I actually have built equipment almost capable of that feat!

http://lucidscience.com/gal-rock%20disaggregator-1.aspx

Oh well, the show was definitely fun to watch, and the strikes were not so close that we felt like running.

Watching lightning is so cool! My favorite strikes are the ones that look a mile wide and make that phhhzzzzttt-shhhaaaaaaa-powwwwwwww sound, rocking the house to the foundation. I actually captured one of these strikes last night, and judging from the photo, the strike was probably just at the boundary of our yard, about a mile away. You know the lighting is close when sound and flash are less than a second apart since sound travels at 750 miles per hour.


I could never actually ride this thing!

OK, enough about the weather, it's starting to aggravate me now since once again I am stuck indoors due to the usual 60% chance of thunder showers today. Maybe one day I will actually get to take the last few photos needed to release the Transporter Cargo Bike plan.

As a diversion, I dug deep into my bike graveyard photo director and found this funny one wheeled scooter contraption that I built and could not ride. The idea was to balance like a pendulum and kick with one foot to glide. I figured it would take some serious practice to learn to balance this thing, but being decent on a unicycle and able to pilot almost anything, I thought I could do it - wrong! After a long weekend at camp and almost non-stop practice, I managed a total of about 100 feet on the one wheel scooter. Seems, there was not enough counter force at work when pushing along the Z axis, although side-to-side balancing was pretty easy.

Of course, I will never give up until I make a workable one wheeled scooter and do have another plan that involves some counter acting weights and a sneaky lever system, but probably won't try it anytime soon. I did make this thing out of the one wheel scooter though, so it wasn't a total loss.

http://atomiczombie.com/Tutorial%20-%20The%20Spin%20Scooter%20-%20Page%201.aspx

Well, that's about it for now, not too much in the way of bike building progress, but tomorrow is actually calling for no rain, so the Transporter may get finished finally. If it rains again tomorrow, I am giving up on building anything with wheels and will start making water craft!

~ Brad


www.AtomicZombie.com

Thursday, July 18, 2013

Mutant Ninja Flowers and a Turtle

The AZ Yard Muncher


I know, it’s a bizarre name for a blog title, but when I started doing these morning musings, I decided to just write about the day before and try to keep it fun! As I had mentioned previously, this place has been like a rain forest lately, with rain almost every day for weeks on end. This onslaught of cloud juice has made bike building a real chore since I work outdoors mainly and have a completed bike that I need to take final photos and videos. Yesterday, the rain turned into more of a drizzle so I took this rare opportunity to get the mower out and get some of the yard cut. Now, this may not seem like much of a big deal, but we have to mow a three acre section of the yard. OK, that may also seem like no big deal but get this...I hand mow the thing!

No doubt you think I am insane for mowing three acres with a hand mower, but we have no place to store a ride mower, and this twice monthly mowing sure keeps my legs in good shape. Of course, a true garage hacker would NEVER EVER use an unmodified appliance, so of course I turned this otherwise tame mower into a beast of fury by modding the deck.

As you can see, the safety guard thingy that once held the bag has been replaced by a steel horn like thing that looks more like a snow thrower output horn. This little mower can now shred 3 foot grass, leaves, even small trees into mulch, tossing the shavings in the air a good 10 feet. Before I made this scary mod, the mower could barely cope with knee high grass and would jam up once every half hour. When I mow this yard, it takes me seven to eight hours if I walk non-stop, only stopping to refill the tank.


Mutant mow-proof wild flower

Since we have been having rain forest like rain lately, I have not been able to mow for more than 2 weeks, and these tall yellow glowers have taken up most of the yard. I don't know what these things are, but I don't think they are from this planet, and probably came here on an asteroid or some alien probe. In two weeks, these things grew over 2 feet tall and they can actually survive being run over by the mower. Yeah, no kidding, I mow them over two or three times and they just pop back up! I pulled one out by hand for inspection and they seem to have a stem made of green carbon fibre. At less than a quarter inch thick, the stem is so durable that it cannot be snapped by hand, and is as strong as wire. Anyone know what these things are? I wonder if dynamite will get rid of them?

Half-way through my mowing, a turtle decided to crawl up the hill through the tall grass for a visit. This little guy/gal was a bit annoyed by being picked up at first, but then relaxed and seemed to enjoy the free ride to the other side of the yard, away from the Yard Muncher. There are several creeks and ponds way back in the yard, but these are almost a mile away, so it must have really wanted to explore to make that kind of journey.


This cool dude came for a visit

With the way the weather is changing around here, I wouldn't doubt that the next thing that comes wandering our of the pond will be a big ol’ gator.

~ Brad

Wednesday, July 17, 2013

Random thoughts, more rain!

Managed to snap a pic in between storms.

It's official; we now live in the rain forest! And, when it's not raining, the humidity hovers between 70 and 80 percent, so it might as well be. Oh well, here I am complaining about the rain when three months ago I was up to my waistline in snow. I guess that spring and fall really are the only good seasons for an outdoor bike hacker like me.

I did manage to get an hour on the Transporter Cargo Bike and added the cables, levers, and shifters. The first test run went well minus the fact that I had almost no air on the front tire. To complete the plan, I still have to get some photos and video of the bike being loaded with cargo, so it will be a game of waiting for the weather to cooperate.

Wow, a day that might not rain!


This week's forecast is pretty much the same as the last two months with 40 to 60 percent chance of showers, which really means spitting rain every hour followed by intense rain for a few minutes and then 70 percent humidity until the next wave of rain. I don't ever remember this much rain, and I am seeing plant life that looks like it belongs in the Amazon jungle around here.

New welding and grinding tutorials coming


In an effort to do something useful this year, we have decided to start making some highly detailed welding and grinding tutorials to replace the old ones on our website. These will be step-by-step video and photo tutorials from the very beginning that will show a noob what kind of welder and gear he or she might need, right up to controlling distortion. Since bike building seems nearly impossible out here this year, I plan to retro fit the non-leaky side of my shack with some backing boards and turn it into a video studio to make the new tutorials.

I will be purchasing a MIG welder as well for the tutorials since many are using one and will go through the process of both arc welding and MIG welding in great detail. Grinding tutorials will be the same in depth video and photo tutorials with hundreds of images lots of example videos, and text that explains everything one would ever need to know in order to jump head first into this great hobby.

A robot project from 2001

I like to dig through my old photo archives when I am doing my morning blog. Here is a real retro photo of one of my first large robot projects. If you can drag your gaze away from my super cool sideburns for a second, then you will see that I am riding on the robot, with an RF controller in my hand during a test run of the differentially steered transmission system. This robot was quite unstable and dangerous since it could reach speeds of 20 miles per hour and then flop over face first when something glitched in the motor drive processor!

But, the robot was fun to operate. I would sit indoors looking at a video link being transmitted from the head mounted camera and navigate (carefully) around the block, interacting with stunned bystanders using a text to speech processor that made the robot talk. I do miss building these things. Once I have an indoor workspace again, I have plans to build a 4x4 autonomous robot that will patrol our yard and keep that dumb bear off the property.

Well, I am going to head our and face the rainforest now. I have to find a way to cut the lawn in between drizzle as it is now knee high in most areas. Talk at ya later.

~ Brad