Wednesday, July 31, 2013

A unique highway lowracer

A big wheel forkless lowracer


Even though my bike building has come to a bit of a halt this year, that doesn't mean I’m not coming up with new ideas on a daily basis.  A few times a day, I like to find a quiet place to relax with a notebook and sketch up new project ideas. I have really missed my Marauder. I think it may be time to make another long wheelbase lowracer so I can get out once in awhile to feel that burn as I push both machine and engine to the limits. The terrain out here is not the same as the city, so my lowracer will need to have suspension to take me down the gravel road out to the highway. There isn't much traffic on the paved highway around here and the ride would certainly be challenging thanks to hills and tight corners.

Another option is to transport it to a nice stretch of country road about 15 minutes from here where there is very little traffic and fairly smooth straight terrain. There are many cyclists using this stretch. I can just see myself eating roadies up once again as I slip under the wind and pass them one by one!


Some forkless bike examples


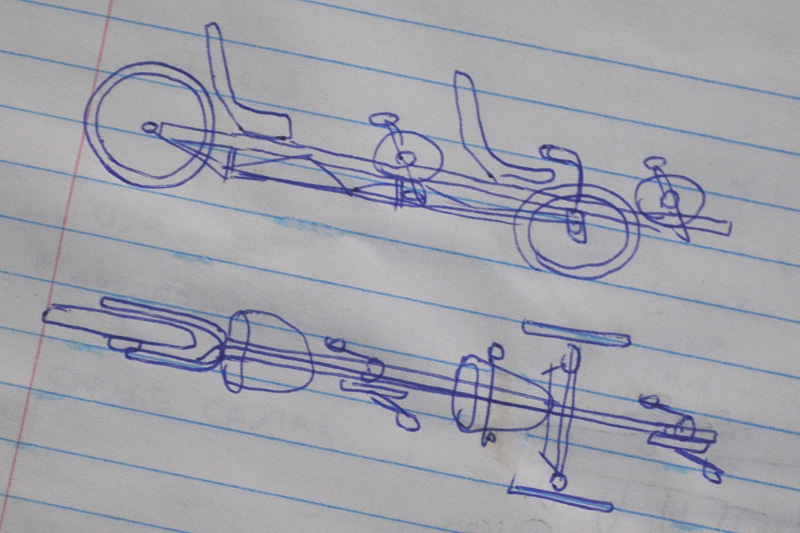
This time though, I want a very unique lowracer that has 700cc or 26 inch wheels on the front and back, a rear suspension, over seat steering, and no front forks. Yep, you read that right, no front forks! I have two designs for a forkless bike: one with a hinged triangle and the other with a wrap around frame that allows the front wheel to pivot much like the front wheels of a quad or tadpole trike.

Having no fork over the front wheel would mean that a larger wheel could be used without obstructing the pilot’s view. This will also smooth out the ride, so it would be a decent chassis for an aerodynamic fairing, allowing the rear suspension and long frame take up the bumps. Suspension is a must on a faired lowracer since these things can easily reach automobile speeds, making the smallest bump feel like a pothole. The forkless design and long wheelbase configuration also keep the front of the fairing low so that you can see the road ahead rather than having to peer around the body. This type of streamliner would not be all that great for pack racing on a track, but out on the open road, it would be a real blast!


A crazy pivot fork bike


The easiest forkless design is shown in my sketch and in these cool examples, where the hub pivots on a kingpin held in place by a single tube that wraps around the wheel, leaving space for the turn. I would run a connecting rod up to a control arm just behind the front wheel and then use dual cable steering to get around the curved tube so that there would be less flex in the system and tighter side tolerances for a fitting into a full fairing.

My other version involves a hinged triangle with the pivot very low behind the wheel to keep the tiller effect minimal. I have tried this in the past on this crazy ride called "Tour De Hell", but the result was a bike that had serious bad attitude and took a lot of practice to ride smoothly.

Of course, having a short wheelbase and a huge amount of tiller, this bike steered like a front end loader, swinging from side to side and causing serious steering feedback. I think this system would work out on a long wheelbase recumbent if the pivot had more caster and was placed much lower to get it closer to the axle. I am not sure if I will actually try the pivot fork design since the other method would defiantly work as expected.

Perhaps this winter I may cut some tubing and lay out my new forkless highway lowracer. I always wanted to build a long wheelbase lowracer and then go all the way on a fiberglass fairing so I can get out and push the limits of what is considered possible under human power. I certainly won't be heading to Battle Mountain to race with the big boys of speed, but I would certainly have fun smoking past road bikes doing 50 MPH on a faired lowracer down our country roads!

~ Brad


Tuesday, July 30, 2013

No summer this year!

More rain - what a surprise!


Well, it's official - this has now been the worst summer I have ever experienced in all my time on this planet! I have a total of five days of bike building time in since the snow melted and will be officially throwing in the towel this year. Normally, I can get three to five bikes out in a year, but this year will leave us with only one new bike plan, the Transporter Cargo Bike. Now, it may sound like I am giving up too soon, but with the fact that it rains almost 90% of the time here lately and the fact that I have oodles of yard work to get done mixed in there with a 10 hour work day, it's not lookin' too good, eh.

There have been some cool lightning storms this year which is pretty typical, but the rest of the time has been spitting rain every hour or so. I would rather have a massive downpour for hours and then some clear skies for a few days, but this year it has ALWAYS, ALWYAYS, ALWAYS been raining just a little. This makes it like a swamp down the hill in front of my bike building shack, and since I have to work and photograph projects outdoors, it is impossible. It's just enough rain to stop me. And, I have given up falling for that stupid "20% chance of rain" lie they tell on the weather network because what that really means is spitting rain every three hours so you can't work outside, Suckah!, bwa ha ha ha ha!


The line snapper after a good wind


Another thing that is happening around here is intense bursts of wind. Now, I'm not talking about a nice summer breeze, I mean tree-snapping, furniture-flinging, tent-collapsing wind. This unnatural weather amplification downed this old +80 foot tall tree at the corner of our yard and it snapped the hydro line with such force that it broke a hydro pole in half down at the bottom of the hill. The good news is that I wanted to clean up this part of the yard and we now have a woodstove, so free firewood!

Being a noob at cutting wood, I took my brand new chainsaw and worked on this monster tree for three days, getting what seems to be at least a cord of wood out of it. But after a week of use my chain seems dull. Is this normal for a chainsaw? Hmmm...at that rate I might as well look for a huge bow saw and spare the hassle of fiddling around with mixing oil, bar oil, dull blades and all that noise.


This will be my view for the rest of the year


So, instead of fooling myself into believing that I may actually get to build anything this year, I have decided to work on adding some useful stuff to the AZ site. We will be starting the new welding, grinding, and bike hacking tutorials /DVD production soon and I am dedicated to adding all kinds of bike tech calculators to the main site. I want to hear from our community and get a list of suggestions for making online calculators.

I am working on the following calculators and converters: tubing weight, metric/imperial, spoke length, Ackermann steering, chain length, rake & trail, and gear ratio.

If you have an idea for an online calculator, please suggest it in the forum: http://forum.atomiczombie.com/forumdisplay.php/189-Conversions-calculators-amp-more
That's all that's new here. I am looking out the window and guess what, it's gonna rain again soon!

~ Brad


Friday, July 26, 2013

The time and space conundrum

Our basement before any renos were done


Time and space are those two things that have always managed to stump the world's greatest thinkers, leaving us to the stark realization that we are but visitors on this rock, hurling through time and space at 66,000 miles an hour, tethered to a burning sphere by an invisible force in an unfathomable universe. This most of us take for granted, while refusing to believe these forces have any more effect on us than a butterfly beating its wings halfway around the world.

Yeah, I stole that quote from the X-Files and my mention of time and space here is under a different context, a more literal one; most of us need more free time and a larger space to work in! I am constantly trying to find more room for my junk (priceless parts collection) and at the same time store my creations, but there is never enough room, so often bikes are recycled for parts after a year or two. This constant shuffling of stuff then leads to my ever present lack of time, and often I just let things pile up and work around the mess since a full cleaning would take most of the day away.

After we moved into a single wide modular home, I knew that my indoor workspace would need more a lot more room; it was time for some basement renos. I have a fair collection of electronic bits for my work, so storage space and workbench room are very important. I decided to turn one end of the basement into a lab. It's always fun to share photos of our workspaces, and since I have blogged about my old bike building shack down at the bottom of the hill, I thought it would be fun to show the space I am occupying as I write this now. The lab!

Anyone who has been in a modular home knows that they are 16 feet wide and long, really long! We decided to custom design the modular to sit on a full 9 foot basement so that we would double our space and end up with huge windows, making it seem less like a basement and more like a split level. The engineered trusses are great because all of the ductwork is out of the way, 9 feet about the floor level.

All of my electronics parts, robot bits, and good bike parts ended up in the basement, since we have very little outdoor storage space. The AZ parts orders are also packed down here on the brown table. There is a decent amount of space here, but I have not had much time to organize it or do any work. I did however, get to complete my new lab recently and am typing out at you from it right now.

Working with wood instead of steel


When you are a DIY type, it doesn't matter what materials or tools you are using - you just measure three times, cut once and adapt along the way. Working with wood is certainly easier than steel, but doing a proper renovation does take a lot of research into code. Living in a Northern climate and having a 5 foot concrete wall with a 4 foot stud wall on top took some amount of planning in order to get the insulation done correctly. I had to build another 2x6 wall an inch ahead of the concrete wall and create an air barrier on the cold side then a vapor barrier on the warm side, keeping to an R24 insulation value.

Sure, I know what I am talking about now, but when I started, I didn't know the deference between an air barrier and a moisture barrier. A moldy basement was not something I wanted, so I did my research. The secondary wall took out about a foot from the width of the room, but it still ended up being 14x16, and that was certainly enough room for me to work on my technical projects and plan writing.

My new lab partially completed


I continued the secondary wall up to the top, added a suspension ceiling, lights, lots of electrical and then put down a waterproof composite floor that looked like hardwood. I was quite happy with the final results, considering much of the things I did were new to me. I still need to finish building the cupboards and workbenches, but I am quite comfortable on the temporary tables and have plenty of room to store my stuff.

So, if time permits, I will once again expand my space, enjoying the rewards of DIY and learning new skills as I move along.  No doubt, if you are the type of person who would build a bike, you probably enjoy other DIY projects as well around the house and yard. DIY is a way of life!

~ Brad


Human-powered hover bike wins coveted $250K prize

Wow! What an accomplishment by the University of Toronto team!

A long-elusive aviation innovation prize that has never had a winner in its 33-year existence has finally been claimed after a team of Toronto engineers built and then flew a human-powered hover bike.

Full story:  Human-powered hover bike wins coveted $250K prize

Thursday, July 25, 2013

Bike stuff to get done in 2013


It's been a busy year for me so far, with little time to get into bike projects. As many of you know, AZ is a spare time venture for us, so my garage time comes when yard work is done, when the weather is good, and when our day jobs are not running on overtime. Lately, free time has been sparse.

So, in order to utilize this scattered free time I have had lately, a new plan of attack has been laid out that will keep me in the garage hacking mode and add some new stuff to our site.

We have decided to start on an in-depth series of tutorials that will also become mastered into a DVD set for those who want to watch them on the big screen. We will cover welding, grinding and general bike hacking from beginning to end so that anyone can jump into this great hobby and learn everything needed to create a successful project.  All of the tutorials will be available for free on our Tutorials section, and the 3-part DVD will be offered for sale just like a plan.

I am also working on a bunch of online calculators geared towards the things we do, so you can just plug in your numbers and get the answers to common problems such as measurements, spoke length, gear ratios, tubing weight, wind resistance and other useful calculations. If you have any suggestions for an online calculator, then stop by our forum and make a suggestion. We would like to make AZ the ultimate place to be for creative bike builders!

Saskatoon berries calling to be picked


With all of the rain we have had lately, my favorite summer time berries have finally arrived. Saskatoons are a sweet berry that seem to fall between cherries and blueberries on the taste scale, and they so are abundant around here that a single tree out of the dozen in one field could fill a barrel. I like them so much that I often skip lunch and just head out to the trees to eat like a bear! The crab apples are also coming along, and they will be replacing the 'toons about a week after they all dry up. Oh, and don't forget the raspberries; they are soon to arrive as well. This is a tasty place to live.

Ok, I will keep it short this morning as I am going to start coding those online calculators and hope to have something to show this week. Wish me luck; I am about to dive deep into web coding again and do battle with a foe that makes Murphy's Law seem tame!

~ Brad


Tuesday, July 23, 2013

New Plan Online - The Transporter Cargo Bike

The Transporter Upright Cargo Bike

Well, it's finally online! The Transporter Upright Cargo Bike is the latest addition to the AZ plans page and is ready for download. It has been a real battle trying to find a few hours between the rain to get the bike photographed, but the weekend played nice for an entire day. I had fun moving some cargo around the yard and down our windy, hilly dirt roads and everything worked perfectly.

This plan takes a typical department store mountain bike or road bike and converts it into a rear loading cargo bike, leaving the front section of the bike in its original form. By keeping the part bike mostly unmodified at the front, the ride and stance is much the same as any bicycle, so you can head out into traffic and maintain eye level with those gas guzzlers.


A typical yard sale mountain bike


This plan is highly adaptable to your needs, and includes a rugged frame that can carry many different types of cargo carrying systems. The Transporter can be made to practically any wheelbase and the entire plan only requires standard bicycle components and a few lengths of round or square tubing, so it will be an inexpensive and straightforward build. I opted for a flatbed cargo top since I intend to move some large items around such as firewood and potted plants.

Testing the brakes down our hill


I loaded some heavy cargo and drove the bike down the steep hill up to our driveway for a brake test. Even using only the front disc brake seemed to offer adequate stopping power, and the handling was good. The only learning curve was getting used to the wide turning circle of a bike with an 8 foot wheel base. I did manage to get it turned around in the width of our narrow dirt road, but did use the entire road to do so. For typical navigation, the bike handles just like a regular cycle.

Blending in with the wildflowers


Our field is just bursting with color these days thanks to the rainforest-like climate over the last few months. Normally, the wildflowers bloom in shifts of yellow, white and then purple, but this year they are all here at the same time. I rolled the Transporter over to the edge of the yard and got some great shots of the bike contrasting against the rolling blue and white sky and the matching yellow in the field. I think photographing a bike is almost as fun as riding it, and I enjoy trying out different backgrounds to set the mood of the shot.

Well, there you have it, another plan completed. We are now turning our focus towards a set of highly detailed welding, grinding and bike hacking tutorials which will be part of our tutorials page and offered for sale as a complete DVD as well. I should be able to do most of the filming under the non-leaky section of the old trailer, so the rain will not get in the way this time.

~ Brad


Friday, July 19, 2013

Bike builders news July 19


 Feature articles by RadicalBrad of AtomicZombie.com:   
Transporter Cargo Bike is done - this project has been challenging
Paper, Proto, Plan, Precipitation! - the design and build process

***

Head tubes and bottom brackets for your bike projects - in stock
Freewheel axle and disc brake adapters - for your bike projects
Chains and brake cables? - let us know what you think  

*** 

Bike builders community chat - hot topics of conversation     
 Bike builders gallery  new additions - recumbents, trikes, choppers & more    
Builders Feedback - we love to hear from you.

***  

Free DIY tutorials - many in PDF format
AZTV webisode - There and Back Again: A Zombie's Tale 
  This and archived newsletters are here.

*** 

Thanks for your feedback, and keep those suggestions coming. 
  
See you in the Builders Forum. 


Like us on FacebookFind us on Google+

Visit our blog

100 million volts and an un-ridable scooter

Lightning and propane - not so good! This picture was taken after dark.


Last night was yet another typical example of the weather around here for the last two months - torrential downpours followed by non-stop lightning. Is it just me or has the weather really changed over the last few years? Everything is much more intense it seems, with more snow, more rain, more heat and more cold. Global warming? Yeah right, maybe in the summer, but winter around here is worse than ever. I would like to propose a new term for this wild shift in weather - "Climate Amplification". Things are not hotter or colder; they are just more intense.

But, I did have fun with the camera last night.


A very intense strike at the back of our yard


The lightning flashes were so intense and so often that it was easy to capture them with a camera. Odd, when I was younger I tried so many times to get just one photo of lighting but never could and now I can get 50 good shots on two days out of a typical week. Perhaps my next project should be a giant high voltage capacitor that can store 100 million volts and then convert it to a lower voltage for later use. Hmmm...as some of you might know from this project, I actually have built equipment almost capable of that feat!

http://lucidscience.com/gal-rock%20disaggregator-1.aspx

Oh well, the show was definitely fun to watch, and the strikes were not so close that we felt like running.

Watching lightning is so cool! My favorite strikes are the ones that look a mile wide and make that phhhzzzzttt-shhhaaaaaaa-powwwwwwww sound, rocking the house to the foundation. I actually captured one of these strikes last night, and judging from the photo, the strike was probably just at the boundary of our yard, about a mile away. You know the lighting is close when sound and flash are less than a second apart since sound travels at 750 miles per hour.


I could never actually ride this thing!

OK, enough about the weather, it's starting to aggravate me now since once again I am stuck indoors due to the usual 60% chance of thunder showers today. Maybe one day I will actually get to take the last few photos needed to release the Transporter Cargo Bike plan.

As a diversion, I dug deep into my bike graveyard photo director and found this funny one wheeled scooter contraption that I built and could not ride. The idea was to balance like a pendulum and kick with one foot to glide. I figured it would take some serious practice to learn to balance this thing, but being decent on a unicycle and able to pilot almost anything, I thought I could do it - wrong! After a long weekend at camp and almost non-stop practice, I managed a total of about 100 feet on the one wheel scooter. Seems, there was not enough counter force at work when pushing along the Z axis, although side-to-side balancing was pretty easy.

Of course, I will never give up until I make a workable one wheeled scooter and do have another plan that involves some counter acting weights and a sneaky lever system, but probably won't try it anytime soon. I did make this thing out of the one wheel scooter though, so it wasn't a total loss.

http://atomiczombie.com/Tutorial%20-%20The%20Spin%20Scooter%20-%20Page%201.aspx

Well, that's about it for now, not too much in the way of bike building progress, but tomorrow is actually calling for no rain, so the Transporter may get finished finally. If it rains again tomorrow, I am giving up on building anything with wheels and will start making water craft!

~ Brad


www.AtomicZombie.com

Thursday, July 18, 2013

Mutant Ninja Flowers and a Turtle

The AZ Yard Muncher


I know, it’s a bizarre name for a blog title, but when I started doing these morning musings, I decided to just write about the day before and try to keep it fun! As I had mentioned previously, this place has been like a rain forest lately, with rain almost every day for weeks on end. This onslaught of cloud juice has made bike building a real chore since I work outdoors mainly and have a completed bike that I need to take final photos and videos. Yesterday, the rain turned into more of a drizzle so I took this rare opportunity to get the mower out and get some of the yard cut. Now, this may not seem like much of a big deal, but we have to mow a three acre section of the yard. OK, that may also seem like no big deal but get this...I hand mow the thing!

No doubt you think I am insane for mowing three acres with a hand mower, but we have no place to store a ride mower, and this twice monthly mowing sure keeps my legs in good shape. Of course, a true garage hacker would NEVER EVER use an unmodified appliance, so of course I turned this otherwise tame mower into a beast of fury by modding the deck.

As you can see, the safety guard thingy that once held the bag has been replaced by a steel horn like thing that looks more like a snow thrower output horn. This little mower can now shred 3 foot grass, leaves, even small trees into mulch, tossing the shavings in the air a good 10 feet. Before I made this scary mod, the mower could barely cope with knee high grass and would jam up once every half hour. When I mow this yard, it takes me seven to eight hours if I walk non-stop, only stopping to refill the tank.


Mutant mow-proof wild flower

Since we have been having rain forest like rain lately, I have not been able to mow for more than 2 weeks, and these tall yellow glowers have taken up most of the yard. I don't know what these things are, but I don't think they are from this planet, and probably came here on an asteroid or some alien probe. In two weeks, these things grew over 2 feet tall and they can actually survive being run over by the mower. Yeah, no kidding, I mow them over two or three times and they just pop back up! I pulled one out by hand for inspection and they seem to have a stem made of green carbon fibre. At less than a quarter inch thick, the stem is so durable that it cannot be snapped by hand, and is as strong as wire. Anyone know what these things are? I wonder if dynamite will get rid of them?

Half-way through my mowing, a turtle decided to crawl up the hill through the tall grass for a visit. This little guy/gal was a bit annoyed by being picked up at first, but then relaxed and seemed to enjoy the free ride to the other side of the yard, away from the Yard Muncher. There are several creeks and ponds way back in the yard, but these are almost a mile away, so it must have really wanted to explore to make that kind of journey.


This cool dude came for a visit

With the way the weather is changing around here, I wouldn't doubt that the next thing that comes wandering our of the pond will be a big ol’ gator.

~ Brad

Wednesday, July 17, 2013

Random thoughts, more rain!

Managed to snap a pic in between storms.

It's official; we now live in the rain forest! And, when it's not raining, the humidity hovers between 70 and 80 percent, so it might as well be. Oh well, here I am complaining about the rain when three months ago I was up to my waistline in snow. I guess that spring and fall really are the only good seasons for an outdoor bike hacker like me.

I did manage to get an hour on the Transporter Cargo Bike and added the cables, levers, and shifters. The first test run went well minus the fact that I had almost no air on the front tire. To complete the plan, I still have to get some photos and video of the bike being loaded with cargo, so it will be a game of waiting for the weather to cooperate.

Wow, a day that might not rain!


This week's forecast is pretty much the same as the last two months with 40 to 60 percent chance of showers, which really means spitting rain every hour followed by intense rain for a few minutes and then 70 percent humidity until the next wave of rain. I don't ever remember this much rain, and I am seeing plant life that looks like it belongs in the Amazon jungle around here.

New welding and grinding tutorials coming


In an effort to do something useful this year, we have decided to start making some highly detailed welding and grinding tutorials to replace the old ones on our website. These will be step-by-step video and photo tutorials from the very beginning that will show a noob what kind of welder and gear he or she might need, right up to controlling distortion. Since bike building seems nearly impossible out here this year, I plan to retro fit the non-leaky side of my shack with some backing boards and turn it into a video studio to make the new tutorials.

I will be purchasing a MIG welder as well for the tutorials since many are using one and will go through the process of both arc welding and MIG welding in great detail. Grinding tutorials will be the same in depth video and photo tutorials with hundreds of images lots of example videos, and text that explains everything one would ever need to know in order to jump head first into this great hobby.

A robot project from 2001

I like to dig through my old photo archives when I am doing my morning blog. Here is a real retro photo of one of my first large robot projects. If you can drag your gaze away from my super cool sideburns for a second, then you will see that I am riding on the robot, with an RF controller in my hand during a test run of the differentially steered transmission system. This robot was quite unstable and dangerous since it could reach speeds of 20 miles per hour and then flop over face first when something glitched in the motor drive processor!

But, the robot was fun to operate. I would sit indoors looking at a video link being transmitted from the head mounted camera and navigate (carefully) around the block, interacting with stunned bystanders using a text to speech processor that made the robot talk. I do miss building these things. Once I have an indoor workspace again, I have plans to build a 4x4 autonomous robot that will patrol our yard and keep that dumb bear off the property.

Well, I am going to head our and face the rainforest now. I have to find a way to cut the lawn in between drizzle as it is now knee high in most areas. Talk at ya later.

~ Brad


Tuesday, July 16, 2013

Paper, Proto, Plan, Precipitation!

A tandem tadpole trike sketch

I was really hoping to have the Transporter Cargo Bike ready to show off for this morning's blog, so far this year has turned our area into a rain forest. Sure, it’s great for the garden and berry trees, but not great for getting any welding or building time in because my shack has no doors or windows and leaks when it rains. Add to that the 2 foot tall grass and I am starting to wonder if perhaps winter would be more productive after all! Ok, enough complaining I will save that for the end of the blog!

While searching for something else to blog about, I thought of what it takes to turn an idea into a working project. I divide the process into three steps: paper, prototype and then plan. Most of the time, an idea never leaves the paper stage. I currently have 43 full spiral ringed notebooks of bike ideas that I have collected from over the last five years. Sadly, I never kept notebooks before that time, so a lot of cool and crazy ideas ended up in the recycle bin.

I usually start with a few pages of rough sketching just to get my head around the basic idea and how it might look.  It takes only a few minutes to sketch up a bike. The sketches offer a decent view of many of the difficulties in designing a bike or trike such as chain line, seating position and steering. I can usually determine if an idea is viable within a few pages worth of sketching, and by the 10th drawing often the bike or trike is radically different than the original idea. This tandem tadpole trike sketch seemed workable, so it was one of the few drawings from several thousand that moved to stage two - prototype.


The Viking Tandem Trike

All of the AZ plans go through a prototype stage so that ideas can be tested in the real world and then either modified or scrapped. Having a rough prototype means I can beat the hell out of the vehicle and see what it can take, making any adjustments that may be necessary. This tandem trike proto was made of electrical conduit and BMX wheels and took about two weekends to put together. We tested this trike at a campground for three days, beating it up over trails, down rough gravel roads, and even off road at times. It held up, even though there was no frame trussing and many of the welds were only half finished. My thinking is that if a poorly build proto can hold up to abuse, then a properly built final design would certainly hold up to just about any conditions. So, the next step was to turn proto into plan.


Turning paper into prototype

When I built the Viking Tandem Trike based on the original prototype, I made it a lot more durable and added many new features such as an unlinked transmission system, adjustable bottom brackets, dual disc brakes and under seat steering. The 1.25 inch conduit was replaced by 2 inch square tubing and the frame was properly triangulated for supreme strength. Building a plan from a prototype is a much longer process because every step has to be meticulously photographed and documented, but it is worth the effort when I see completed projects based on our plans being posted in the gallery.

So I am 95% into the plan stage on the Transporter Cargo Bike and only need to add the brake and shifter cables to complete the plan. But, the rain-man seems to have other plans, keeping me indoors as of late.

This is a typical site out here lately

The weather report has been practically the exact same for more than a month – a 40% chance of thunder showers and high humidity. What that means is that it spits rain once every few hours and dumps rain once a day. The grass is constantly wet, and my bike building shack smells like the back of uncle Jeb's cabin...ack! I am at the point where I need a nice dry sunny day to get the final photos done, even if the rain holds off for four hours, I would be happy. Oh well, the apples and berry trees are sure enjoying the new rain forest, but the lawn is getting so tall it may take three days to hand mow the yard the next chance I get! I wonder, is there such a thing as an anti-rain dance?

~ Brad


Monday, July 15, 2013

Cargo bike plan in the shade

The Transporter Cargo Bike parked in the shade

Yesterday, I decided to try out our new arbor for the first time by writing the new Transporter Cargo Bike plan outdoors. It was great to actually have some shade out in the blazing summer sun, and although my old laptop screen was a bit dim outdoors, I really enjoyed the fresh air and scenery. Since our home is a ranch-style modular home, it offers practically no shade as the sun passes overhead, so this arbor is our only shaded spot in the entire yard. Well, I guess I could hide in the bush and get shade from a big ol’ pine tree, but then the bugs would eat me alive.

We live in the path of some kind of odd wind phenomenon, so stand up umbrellas get torn and tossed practically every time we tried to use them, but this time we have a solid structure with a lattice roof that blocks out about 75 per cent of the overhead sun. I think I will be doing all of my writing out here from now on and maybe even some of the website design and upgrading.

Having an injured back this week meant that I could not get the cables on the new bike just yet, but I had enough of it done to dig into the meat of the plan. I dragged the bike up the hill, parked it under the arbor and ran an extension cord to my laptop. I make a large document of images and dimensions when I build a new plan, but also double check with a tape measure and angle finder as I write, just to make sure that everything works out.

A typical plan write-up consists of editing about 120 to 150 photos from the 1,500-2,000 that I take during a build. I then edit them all in Photoshop for color balance, resize them, number them and then start adding text in a logical and sequential manner. So, as you might have guessed, this is a LOT of tedious work; being outside was just great. Looking at my office walls for 15 straight hours is boring compared to looking at the tree line and watching the deer stroll past. Hey, was that a bear checking out my Saskatoon berry trees? Grrrrrr!

Making the photos follow the plan

Sometimes the 1,500 or more photos can get out of sequence with what I have on paper because I often work around the weather. There are days when I can put the frame outdoors for welding and then other days when I am stuck in the shack to work on the small bits, so this can really mess up the storyline. Oh well, I had a cool summer breeze, no traffic noise pollution, a view of the greenhouse and the sounds of birds to make the work easier. I sat under the arbor from morning to night to edit the photos until the black flies, mosquitoes and noseeums drove me inside.

Getting some advice from the real expert

Of course, I never work alone on a technical project. My silent partner is always around to give me the look when I do something not so smart. A tilting of his head to the left means that I have a measurement wrong, a right tilt means...hmmm... “Get me more food?” Well, not sure on that one, but my furry buddy "DJ The Prince of Dogness" does know his stuff.

Well, I’d better get back to the plan so I can get it ready for the website and then move right to the next bike project of 2013. There is so much stuff to do around the yard and the weather has been so wacky this year that I must hit it hard every free second or Old Man Winter will be back before I know it. Bark at ya later!

~ Brad

Friday, July 12, 2013

DIY always gets attention

I've always had a passion for radical bike designs.
 
If you have been hacking things together for any length of time, then you probably know that your unique creations draw attention wherever you are. When I was in my early teens, I would string four or five scrap bikes together and my buddies and I would wobble down the street on my contraptions that often resembled bikes from Doctor Seuss books. Making it back home in one piece was a 50/50 chance because I usually only brazed my early bike hacks, but the one thing that was guaranteed was a lot of attention.  My intent was never to make something to draw a crowd, but I often found myself talking to a group of interested onlookers or even speaking into the camera on the evening news.

I took a long break from bike hacking after getting my first motorcycle (and job), but found myself back out in the garage in the year 2000 to rekindle my DIY roots and get my mind off the daily grind of living in the real world. I started collecting junk bikes and old power chair parts and concocted some cool bikes and robots out in the small garage just to have fun on the weekend. Oddly enough, I never took any photos or intended to publish these works. One day Kat suggested that I put some of the bikes up on my website AtomicZombie.com, which at the time was a home for electronics hacking stuff I was doing.


Getting youth interested in technology.

Well, within months I started connecting with some amazing people and realized I wasn't the only one who enjoyed making art from metal, sometimes for fun, sometimes to be practical. It didn't take long before the word spread locally, and we were dragging my creations to all kinds of events. The large video guided robots were always popular. I enjoyed inspiring young hackers to consider this great hobby. The robots were a natural crowd magnet since I controlled them from miles away via video link and could communicate to people by typing words into a speech synthesis station at the base, making the robot seem intelligent. Soon my remote robots’ main purpose was to draw in a crowd and baffle them with technology.

Photo op with some visiting teens from the USA after my World Record ride.
 
At one point, I decided to aim for a Guinness World Record, making the tallest rideable bicycle, and figure it would be fun and possible draw a bit of attention to the website which was now mostly dedicated to bike building. Well, I was certainly not ready for the storm that this thing generated once the word got out! I must have done a dozen live radio interviews, news casts and even a live spot on a a national broadcast of Canada AM . Tall bikes sure draw the crowds!

When the tallbike called "SkyCycle" made it to a full color page in the Guinness Book (along with my mug), I was shocked. I knew these crazy contraptions could draw interest, but I had no idea how far it could go. Even a simple recumbent bike like the Marauder would spend half the time parked as I explained the bike to interested people along a ride. No doubt, all you DIY enthusiast out there know what I am talking about.

When I think back to me pre-DIY days, I guess my inspiration did come from seeing others’ creations, although it was mostly in the form of photos from old Popular Mechanics books or the odd newspaper article. Now, with the internet jacked into our heads like The Matrix, it's so easy to connect with other DIY folks and share advice, so the community is stronger than it's even been. Back in the early 1980s I would have never thought that one day I would be saying, "Hey!" to a cargo bike builder in Africa and then a trike builder in Australia within a 15 minute span.

So, if you are a new builder just getting ready to roll open that garage door and head out on your new DIY creation, get prepared for the attention your work will draw.  You will now become the source of inspiration for a young generation of future DIYers, so make sure you pass along that attitude that drives us all, "Yeah, you can do this, too"!

~ Brad


Thursday, July 11, 2013

Choke cherries and motion sickness

The scenery surrounding my old workshop.

That’s an odd title for a blog entry, isn't it? Well, this is supposed to be a random spilling of thoughts and this morning I was thinking about another prototype that I never got the chance to test and the ripening orchard full of berries in front of my bike building shack.

The small field in front of my dilapidated construction trailer is a 6 acre patch completely riddled with apple trees, Saskatoon bushes, choke cherries and wild flowers. It's quite a scene to behold in midsummer. You can literally fill an ice cream tub up in five minutes just standing under one of the bushes. Oh, how I love my Saskatoon pies and choke cherry jams! Of course, I have to do battle with this strange (dumb) bear that has been coming around when it's pickin' time.

I call this bear dumb because it likes to rip open our composter multiple times to lick the mold out of the same rotten coconut shell, and prefers to break a berry bush in half to eat the unripe berries at the top rather than simply eating the good ones well within reach. Last year, dumb bear tore up a dozen Saskatoon bushes, leaving the best berries sitting on broken branches and only eating the green ones (along with the leaves) at the top. I honestly think this bear ate someone's distillery and remains drunk to this day. Yeah, something's wrong with that furry beast!

There's something not right with this bear!
Here is a shot of dumb bear taken last year as I chased him out of my work area, cursing insults at him. As you can see from that dumb blank stare, there ain't much going on up in that fuzzy melon! I would imagine that my furry albatross will be much larger this year, so perhaps I won't run after him with my camcorder, but instead carry some bear spray or something even bigger. Either way, I don't intend to let him slaughter my berry trees again, since there are 100 more in the field across from my work area that he can munch away on.

I had an idea to amp up my SpinCycle design

Another musing I had was this untested modification I called the SpinCycle Vortex that was built right before we moved out to the country. The SpinCycle Stunt Trike was always one of my favorite fun rides, and even though it can do nonstop 360s that would leave an astronaut feeling queasy, I thought of ways to make it even more intense. My modification added a second set of caster wheels that would engage if the pilot leaned back to lift the front drive wheel off the ground, leaving the trike to rotate freely at whatever speed you were brave enough to handle. This mod would make the trike into a 5 wheel vehicle, and I don't know what you would call that...a "quadrilateral bike", a "quike", perhaps?

I modified the SpinCycle to make it more radical.

To convert the standard SpinCycle into a free spinning 5 wheeler, I removed the original rear T bar and placed it directly under the pilot’s seat. I then added a much larger set of pneumatic caster wheels to the center (main) set so I could get up to some serious speeds by running on this set along with the main drive wheel. A second T bar was added behind the seat, but in a position that placed the new smaller casters about 4 inches off the ground. This way, the pilot could just lean back to swing his or her weight over the main caster set to tilt back onto the smaller caster set, leaving the front steering and drive wheel off the ground a few inches. If you did this right after the start of a spin, the vehicle would be able to spin continually at whatever speed you initiated the maneuver. In other words, prepare to toss your lunch!

Modification to intensify the pilot's spinning experience

Here is the layout of the SpinCycle Vortex. I actually finished this beast but never had the free time to take it out in the parking lot for a test crash since we sold our house in a real hurry and moved. Now, we live miles away from any pavement, so this kind of prototype is difficult to test, since it is not really good for a hilly gravel road. I am posting this here in hopes that someone will try this design and report back the results.

My untested SpinCycle Vortex

Here is the completed SpinCycle Vortex right before it ended up in storage to later get recycled into parts. Just imagine the crazy ride this stunt vehicle would offer! Perhaps you feel like subjecting yourself to G forces that only fighter pilots feel? If so, build this thing and let me know if it actually works! The main casters are taken from an old power chair and the rear ones are your garden variety shopping cart casters.

I think you could also use small kid’s forks, head tubes and front wheels for the center caster set.  If you do build this thing, keep in mind that in 360 mode, you will have zero control, so do your initial crash testing in a large empty parking lot while wearing a full suit of armor and have a friend ready to help you regain your sense of balance after making yourself sick from the spinning!

Ok, I am off to scare away the bears, swat some skitters and build something cool!

~ Brad