 |
| Hammerhead winter trike |
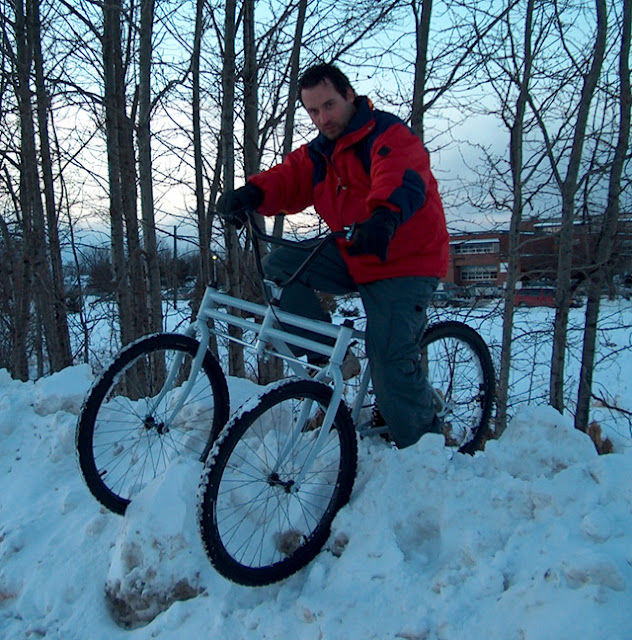
This simple DIY project is designed to inspire you to build a bike to conquer a typical winter climate with snow, ice and slush. The Hammerhead is a two-headed monster that eats snow and ice for breakfast, and has no fear of Old Man Winter or his frozen wrath.
I designed this two headed bike to give myself a way of staying in shape during the winter months. I used to take my fancy, overpriced mountain bike out for winter rides, but soon realized that it wasn’t suitable in deep snow or around icy corners, and the bike was taking a lot of abuse every time I bit the dust (snow).
Obviously, a three-wheeled bike was necessary to maintain balance, so I rebuilt one of those old-style trikes (the kind with two wheels and a big basket in back) and tried to make it as light as possible by removing all parts that weren’t needed, and then added some knobby tires for better traction. The results were very disappointing; not only was this bike as heavy as a tank, but it also had no traction at all. Because that style of trike only drives one of the rear wheels, it mainly just spun around on most surfaces except bare pavement. Adding a differential (a gear system to spin both wheels and transfer power between them) was just too complicated and would add even more weight, so I decided to scrap this type of approach.
My new plan was to have two front wheels for stability and one rear driving wheel for traction. The two wheels up front (tadpole style) design is popular on low-slung recumbent trikes, making them very fast and comfortable, but it is not a suitable design for a winter bike for several reasons.
First, you don’t want to be slung two inches from the slushy ground while winter riding because you will get very wet from wheel spray.
Second, most people driving motorized vehicles will not normally expect to see bicycles in the winter months, so you want to be as visible as possible. A low recumbent trike is not very visible to drivers of motorized vehicles.
Third, is road salt. If you live in a community that routinely uses salt on roads and sidewalks, then this is a problem because salt will corrode metal. Why spend so much and money on something that will require many custom-made parts, and will end up rusted at the end of the year?
Hammerhead is not only as high as a regular bike, but it needs only regular bike parts and a little welding here and there. The design uses a regular mountain bike with two head tubes welded on each side of the frame in order to support two sets of front forks and wheels. Both wheels steer at the same time just like skis on a snow machine. In fact, the steering linkage that I scavenged is from a snow machine!
The trike is called Hammerhead because I thought the finished frame looked something like a hammerhead shark. You see it too, right?
Parts You Will Need
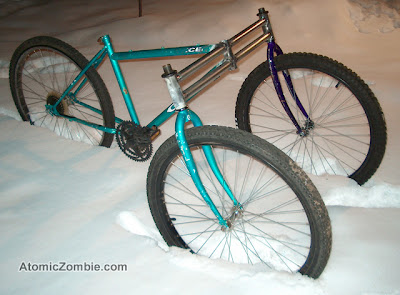
Now that you have a plan and a desire to conquer winter, let's start by gathering some parts. As shown in Figure 1, you will need a complete mountain bike (stripped down to the frame), two front wheels, two head tubes (ground clean) and a matching pair of front forks. The critical requirement here is that both head tubes, forks, and front wheels be identical or very close in size. Even the tires should be the same, as any mismatch will cause the final bike to be uneven and wobbly.
 |
| Figure 1 — Gathering parts for the Hammerhead trike. |
The first step is to create the two head tube extensions. Each head tube is welded to a pair of 12-inch lengths of one inch diameter thin walled electrical conduit, or similar bicycle frame tubing. These two tubes are then welded to each side of the original head tube on the frame. Both tubes are welded at exactly 90 degrees to the head tube, as shown at the top in Figure 2.
If the original head tube is not as tall as the two new head tubes, position the new extension tubes so that they are able to mate to the original head tube. To make a good weldable joint, fishmouth the ends of the tubing to conform to the round edge of the head tube as shown in the lower part of Figure 2.
Weld carefully, tack welding only at first to ensure that the two tubes end up at 90 degrees to the head tube. Any error here will result in a front wheel misalignment, so check the angles with a 90 degree square as you work. Look ahead to see how the extension tubes will place the two new head tubes at the same angle as the original head tube and at 90 degrees to the frame tubing.
 |
| Figure 2 — Creating the two head tube extensions. |
When you have both head tubes welded to their two 12-inch tubes, it’s time to weld them to the original head tube on the donor frame.
As shown in Figure 3, the extension tubes are welded to the original head tube so that all head tubes are at the same angle and so that the extension tubes are at 90 degrees to the frame tubing. You want each head tube to end up at the exact same angle as the middle head tube so that the caster angle remains the same as it was on the original bike. If you imagine two identical bikes standing side by side, then you can picture what we want here.
At this point, just make a few good tack welds around the joint to secure all of the pars together. A final alignment check will be made by installing the forks and front wheels to compare them with each other.
 |
| Figure 3 — Weld the head tubes so that all three align. |
To ensure that the two head tubes are aligned with each other, put the bearings, rings, and forks on both sides and then install the two front wheels. Remember that both front wheels must be the same diameter, which is why both tires should be the same type. When you have both wheels installed, stand up the bike and place both forks in the straight ahead position for a visual inspection. With the parts only tack welded, you can probably make slight alignment adjustments by tapping with a mallet.
Once you are certain that both head tubes are aligned, weld around all of the joints, following the same order on both sides so that any distortions happen equally.
 |
| Figure 4 — Checking alignment using the front forks and wheels. |
To make this frame structurally sound, a set of trusses will be added to the front in order to triangulate the frame. The frame is somewhat rigid as it sits, but any hard force to either front wheel could bend the frame at the joint between the head tube and the new extension tubing.
With some simple trussing, we form a triangle on each side, making the frame extremely strong. Any tube with a diameter between half an inch and 1 inch will do for the trussing. I found some old lawn furniture with 3/4 inch tubing and cut a few pieces to make the trusses.
These trusses are welded from the top of each head tube to somewhere near the middle of the top tube on the main frame. The trussing should be installed a few inches head of where your knee will be when you are pedaling the bike. To find this spot, put on a crank arm and set the seat to your height, then mark it on the frame while you pedal. The main goal is to make sure your knee does not hit the tube.
 |
| Figure 5 — The truss tubing makes the frame very strong. |
Stay tuned for more on this project. Part 2 coming soon.


