Part 2
By Charles Mitchard, Atomic Zombie builders forum
If the original parts were anodized then this has to come off as well. Caustic soda solution (DANGER, BURNS FLESH) will do the job but Easy Off (or similar) oven cleaner is a tad safer. Both methods are messy.
Use the wire wheel on a drill or the bench grinder (I use a drill press) to remove all the paint, corrosion and other blemishes. Be careful on aluminum, as the wires will leave deep grooves which you can see in the picture if kept in one position for too long. If no wire wheel is available then use coarse emery cloth which in all honesty will do a better job but take longer.
The next bit is heaps of elbow grease. Go down through the grades of emery cloth from the coarsest to finest sanding till all the blemishes from the previous grade have been removed. Deep gouges are not possible to remove but most other damage is.
Heavy damage can sometimes be removed with gentle filing but be careful not to make the problem worse.
When moving down through the grades try to go in different directions (ie., first grade sanded north/south, second grade sanded east/west). This helps to prevent deepening any scratches present.
This is the stem after finished sanding. It could have done with a bit more work.
Once you are satisfied that all the scratches have been sanded out and you have finished by using the very finest paper it is time to start with the polishing compounds.
Mark the buffs one with an R for rouge and the other with a T for Tripoli and don’t mix them up. Store them in a zip-lock bag when not in use to prevent contamination.
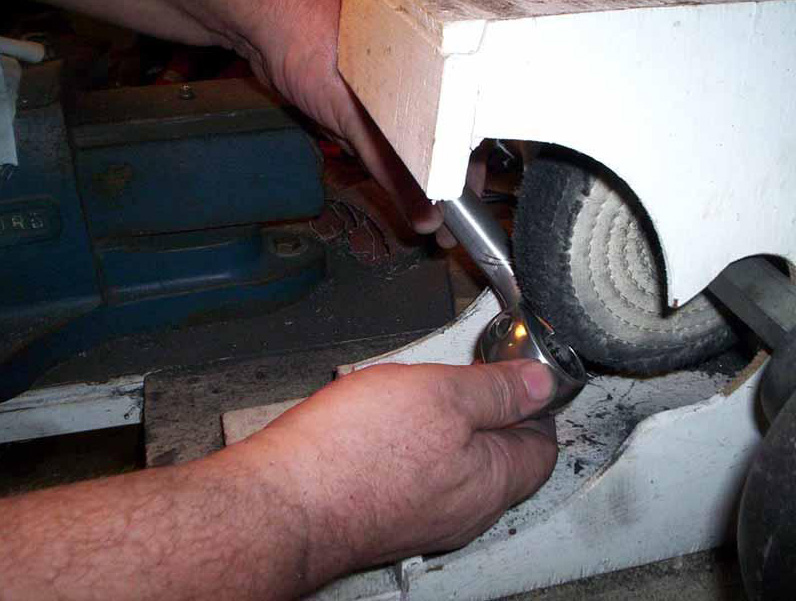
The photo in Part 1 shows two cotton buffs but I now use a sisal for the Tripoli. WARNING. ONLY WORK ON THE BOTTOM OF THE WHEEL AT APPROX 7 – 8 OCLOCK POSITION WITH IT SPINNING FROM THE TOP DOWNWARDS TOWARDS YOU. This prevents the wheel grabbing the item and slinging it back at you. If it grabs when on the bottom of the wheel it slings it away from you. The first time the buff grabs the item out of your hand and flings it away you will need to change your underwear. BE VERY CAREFUL.
I made a box structure from ply to stop too much dust from being slung around but this does make it a little more awkward but grabbed items can't go far.
Start with the Tripoli. Screw the buff onto the spindle, get is spinning and scuff it with a piece of metal making sure you follow the warning above. If a soft buff is wanted then slit some of the stitching before hand. For our purposes I find a firm buff is better. Turn off the machine and when the wheel stops set fire to all the loose threads you have generated.
This is to remove any threads that may catch your fingers.
DO NOT TURN THE WHEEL BACK ON TILL ALL THE EMBERS HAVE DIED OUT ELSE YOU WILL RE-IGNITE THEM INTO A WONDERFUL SPINNING WHEEL OF FIRE.
You will have to do this whenever the buff wears down and leaves loose threads.
Now, to charge the wheel with the Tripoli. Here is the handlebar stem after finished sanding before the tripoli. Once its spinning press the block of wax (Tripoli) to the wheel till it picks some up. Now press the item to be polished against the wheel. Tripoli is a very fine abrasive, finer than the very fine emery so it will produce a sort of polish. Recharge the wheel as necessary to keep polishing. Keep moving the part being polished to prevent polishing grooves into the metal. Once you are satisfied that all the sanding marks are gone its time to change wheels. Pack the buff away in a sealed plastic bag with the block of Tripoli. Wash the item just polished to remove every trace of Tripoli from both the item and your now black hands. And probably everywhere else on your body. I find the best cleaner is laundry detergent but it's very aggressive to some hands.
Once every thing is dry place the rouge buff on the machine and go through the same process as for the Tripoli. Charge the wheel with the block of rouge and away you go.
Here is the final polished handlebar stem. I must admit that I should have sanded a bit more before polishing but it's still heaps better than the corroded black original item.
With both buffs the maximum polish seems to be generated as the wheel is slowed by the pressure applied. Just don’t let it stop the wheel completely.
Here are some before and after pictures.
Here is a typical brake arm after heaps of off road duty—ugly.
The exact same brakes after a bit of TLC as outlined above.
The fat crank arm is straight out of the box, brand new, the other took 30 minutes to sand and 15 minutes each with the Tripoli then rouge. The photo does not do full justice to the shine. The new crank arm is slightly duller then the fresh polished repaired one.
I, for one, think it’s well worth while to put the effort in. Considering how beaten up the chain ring was, I am most impressed with the outcome even though it could be even better with a bit more work.
The biggest problem with doing all this is that you will find heaps of other things that would look better with just a little bit of polish.
Is all this work worthwhile? I believe so and the more effort put into the sanding process the better the final outcome.
Part 1: http://atomic-zombie-extreme-machines.blogspot.com/2010/09/polishing-bike-parts-for-extra-bling.html


